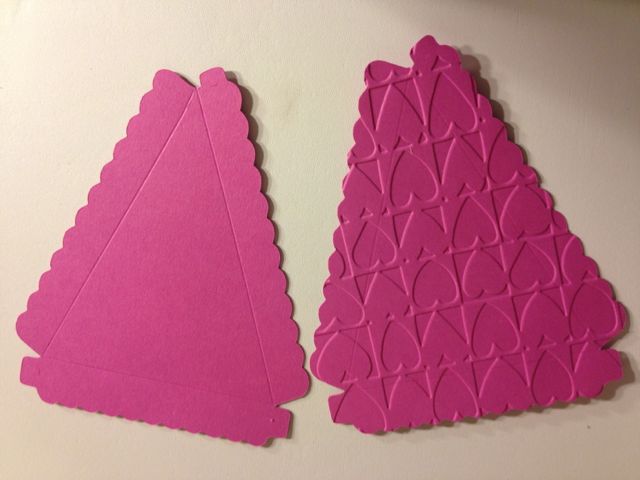
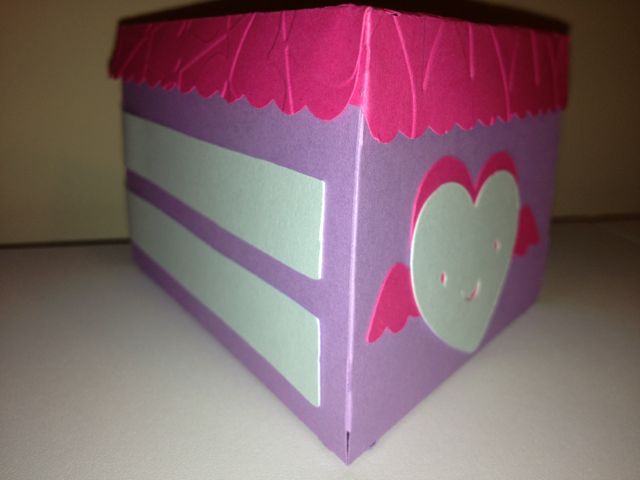
So the second I got a Cricut I was sure to order the Sweet Tooth Boxes Cartridge to make a paper cake for my kiddos for Valentine’s Day! The hardest part was figuring out the measurements. I set the base of the cake slices at 8 inches. If you use Cricut Craft Room, there is an option in the layers tab to make the lid transparent so you can line up the folding edges so that the lid fits. I tried finding exact measurements but it seemed as though no one had mentioned any measurements in the blogs that I had come across on Pinterest or YouTube. It seems like for these types of Cricut projects you almost have to play around with them before you cut a bunch out. Once I matched everything up I used a heart with angel wings from the Create a Critter Cartridge.
I used my Cuttlebug to emboss hearts into the icing for a Valentine’s Day touch!
I had a hard time finding Valentine’s Day paper that was not going to cost me an arm and a leg. I found the perfect Cuttlebug Embossing Folder to make hearts in the frosting! If you own a Cricut and do not have a Cuttlebug I suggest you get one! They are AMAZING!!! They add such a great touch to cards, etc.
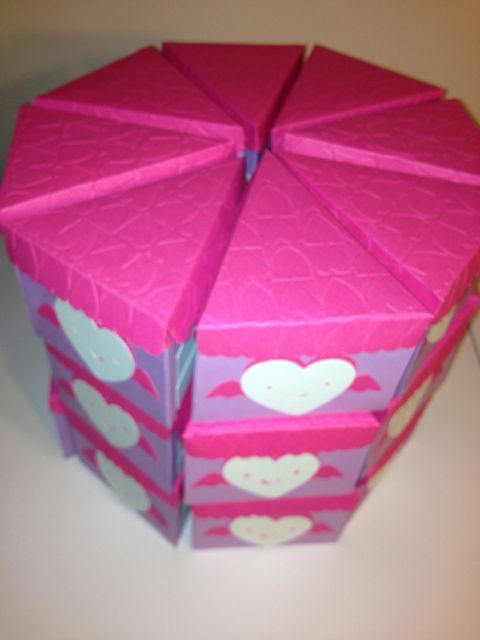
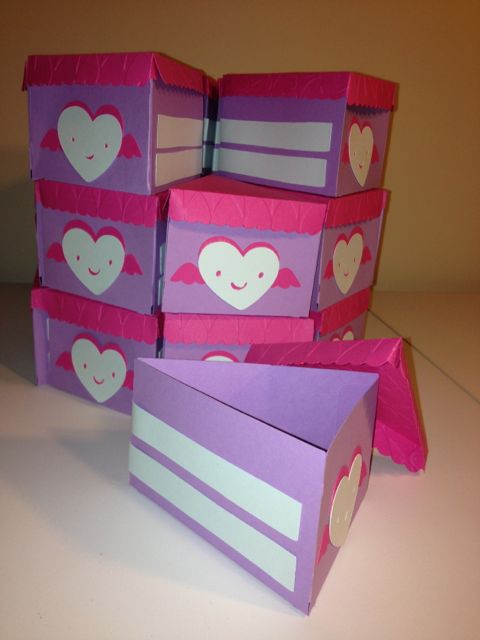
Each kiddo will get their own slice filled with some Valentine’s Day goodies!Ariel View!Are these not perfect?? I can’t wait to see their faces!
So far my 2013 is starting off with a bang! New motivation as I am officially turning the big 3-0. I am doing a killer job kicking off my new healthy lifestyle and I couldn’t be more happy about it! I am really exited about this blog, and everything I am lining up for it! I have loved Pinterest since it came out but I never really utilized it as much until now. I am enjoying my re-found love for crafts and I love me a good Pinterest Recipe!! I hope that the 30’s are the best years because I know how much I grew in my twenties and now that I am inching towards the next chapter of my life.
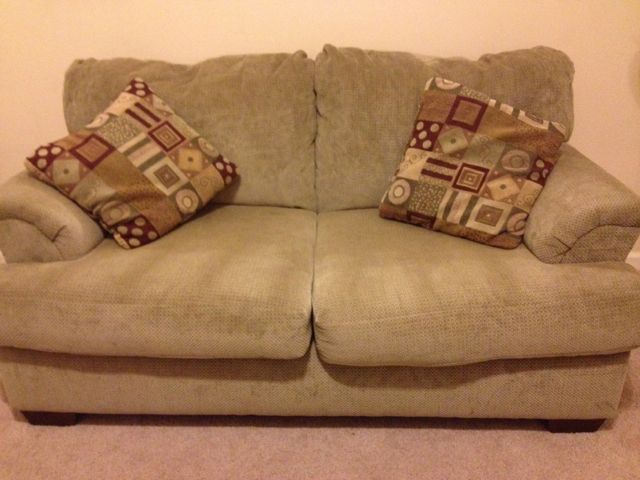
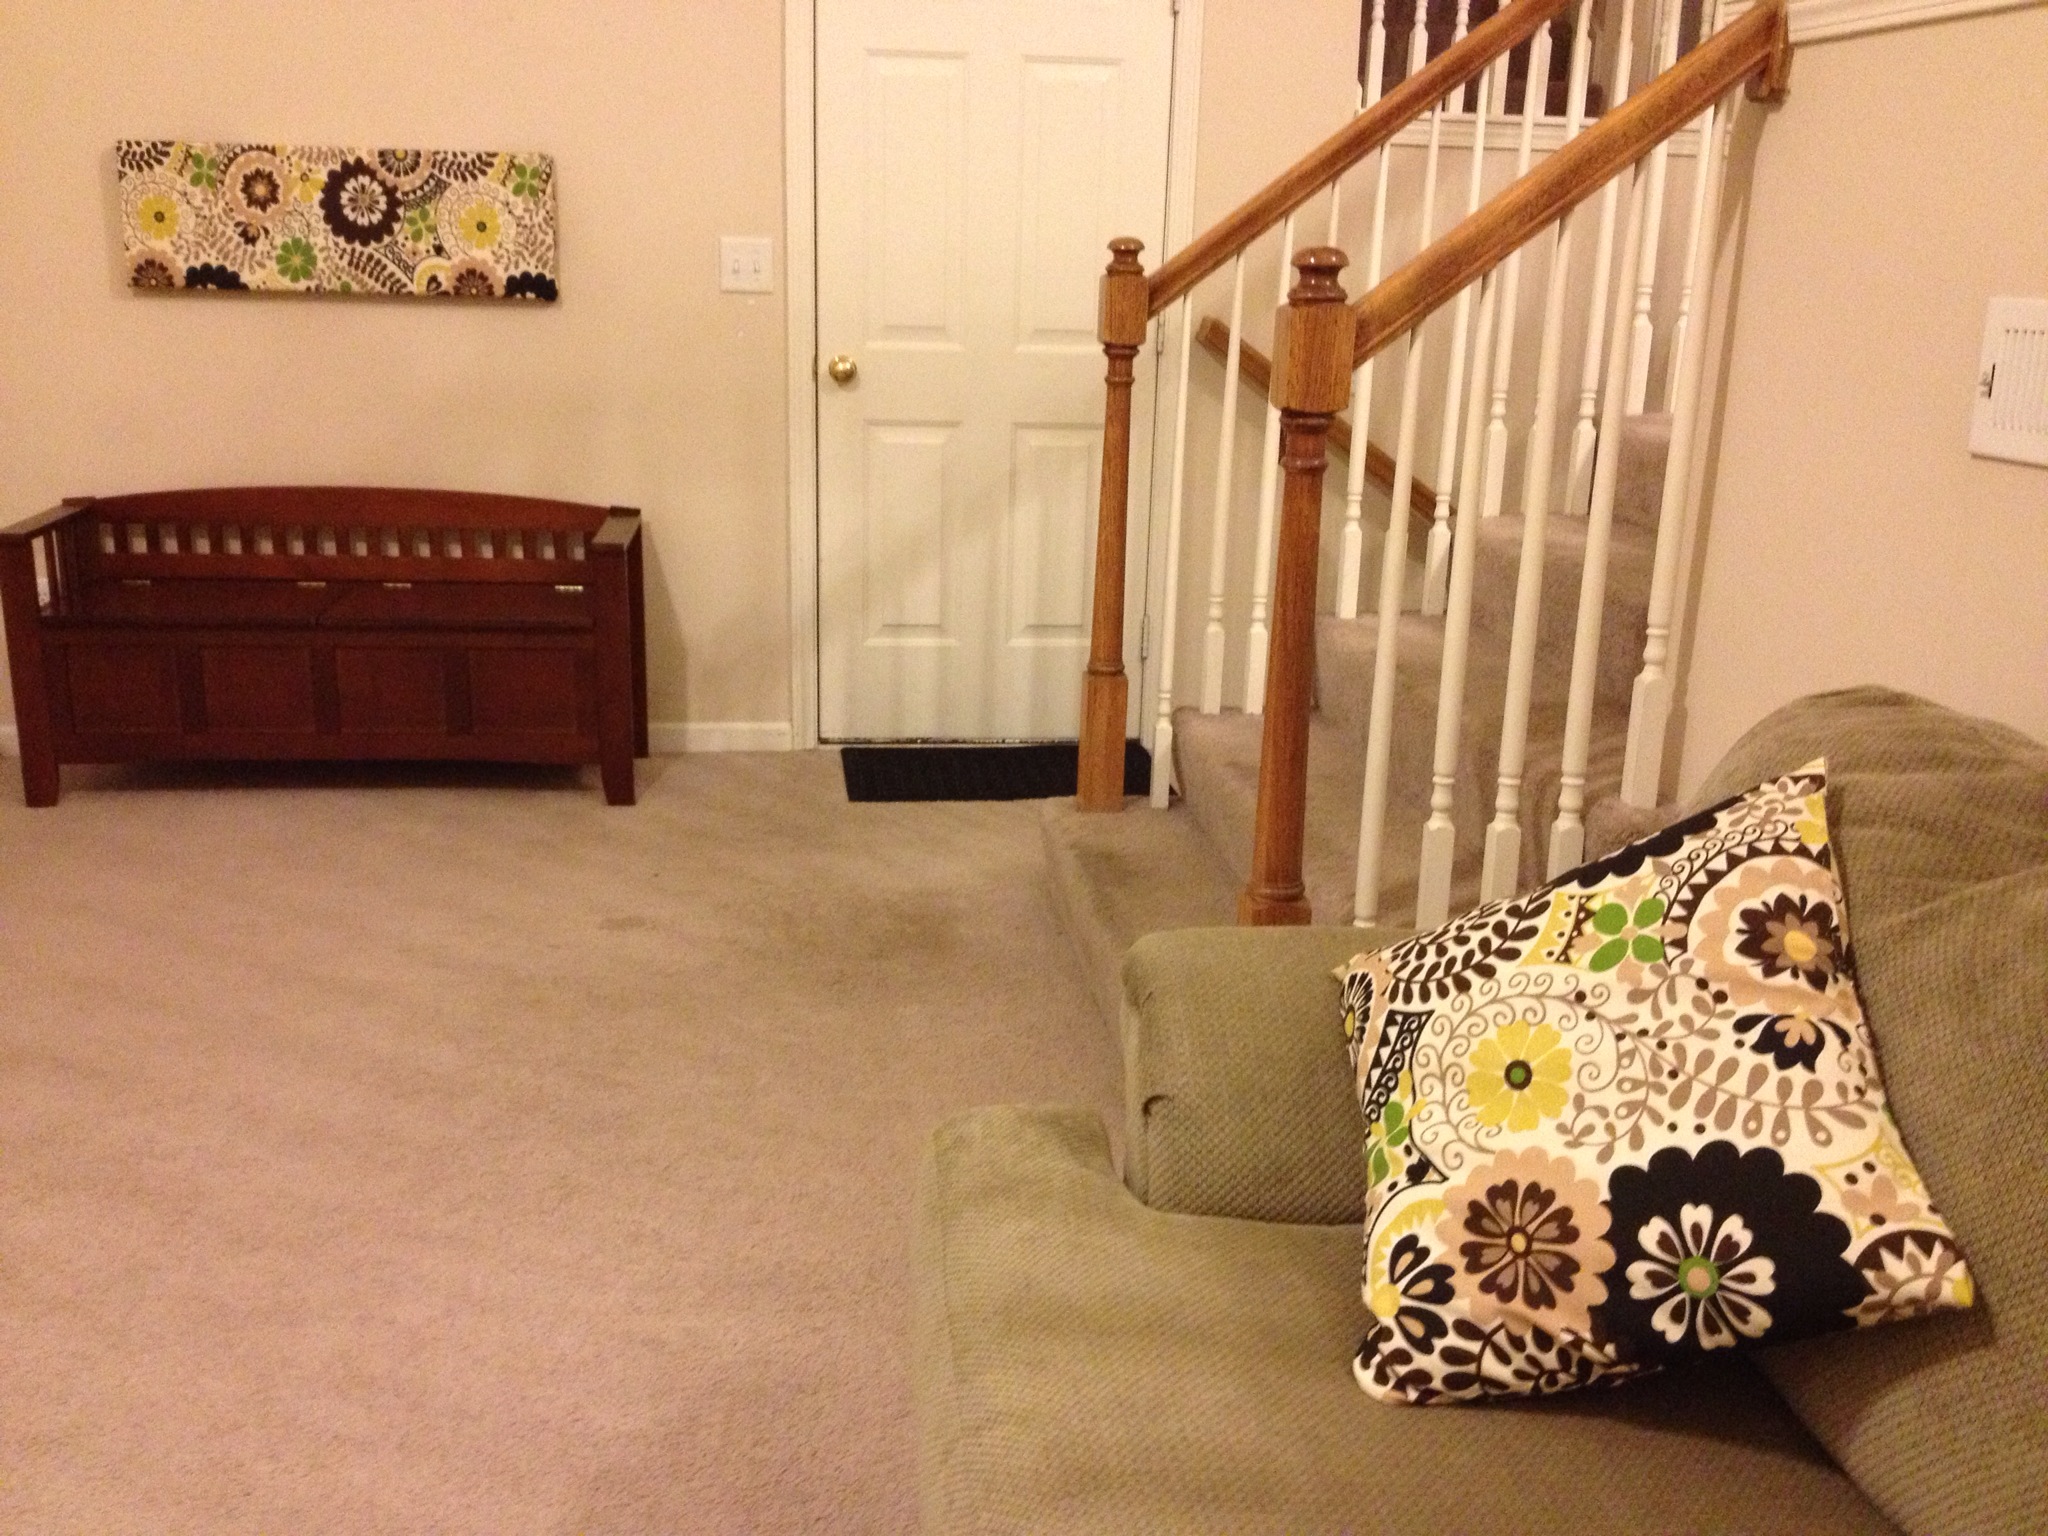
Anyways….onto my project…I moved in with Alex last summer and since he had a house with everything already here and not much room for any furniture of mine I sold and donated most of my stuff (Alex would probably disagree but I DID get rid of a lot of stuff! I just have a lot of stuff so I still have a lot! lol) All of my stuff was black and all of his stuff was brown so I had a hard time using any of my decor because it was too black. I think I have finally found a way to kind of bring the whole room together. Feel free to post a comment I would love some feedback. Alex doesn’t seem to appreciate my decorating talents but he knows it makes me happy so he gets over it!
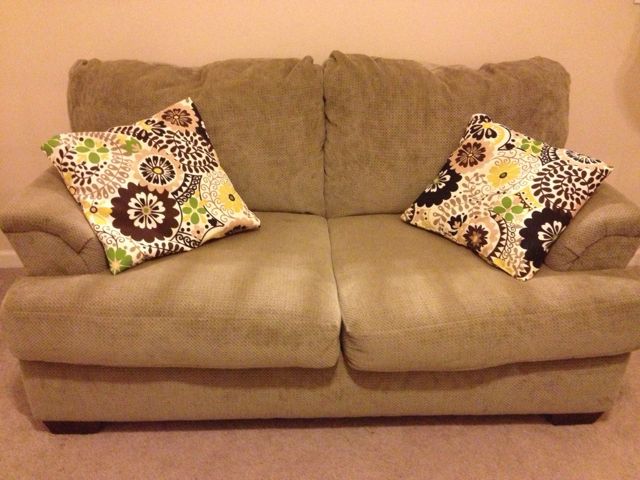
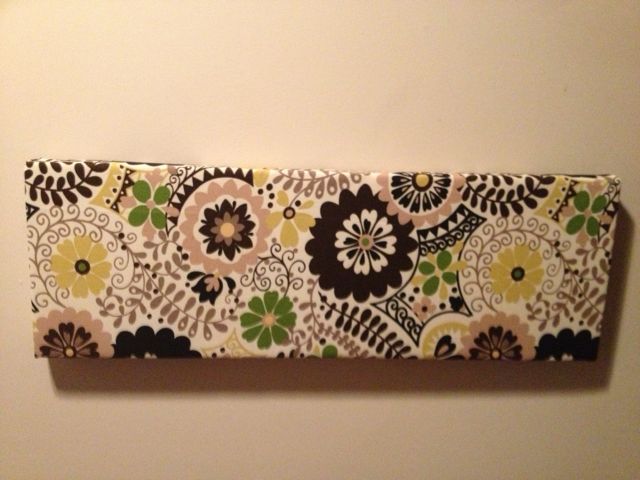
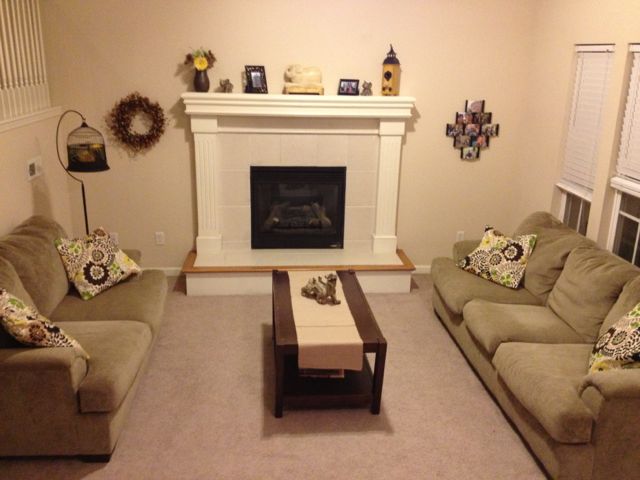
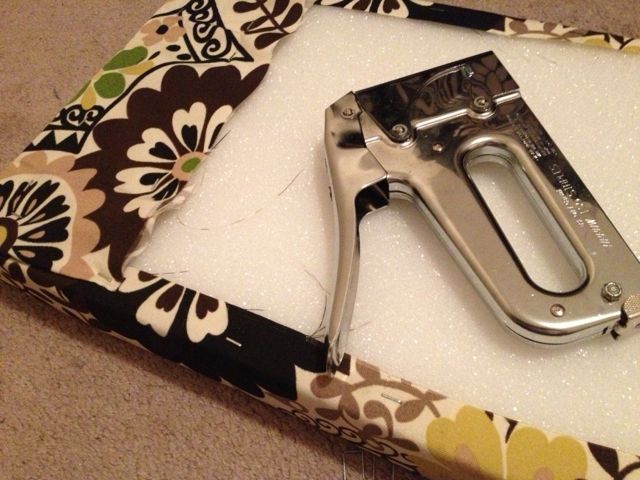
Here is the love seat BEFORE…and AFTER! Don’t the pillows give that love seat a little personality?! I sure think so!Here is another Pinterest project that I threw in to pull the colors together! Notice there is brown AND black together so if I want some black frames they go just fine! This was super easy….tutorial below.It looks so cute above the little bench from Alex’s parents from ChristmasLove the hints of green and yellow!There are several different sizes of styrofoam at any craft store. I don’t even remember what size this was. It took me about 10 minutes. I just made sure to pull tight and stapled all around. The worst part was trying to figure out how to hang it. I am too embarassed to show what I did but the only thing I could get to hold was a piece of cardboard that I cut a slit in and that is what it is hanging from. This is nothing fancy folks…but I think it looks pretty cute!
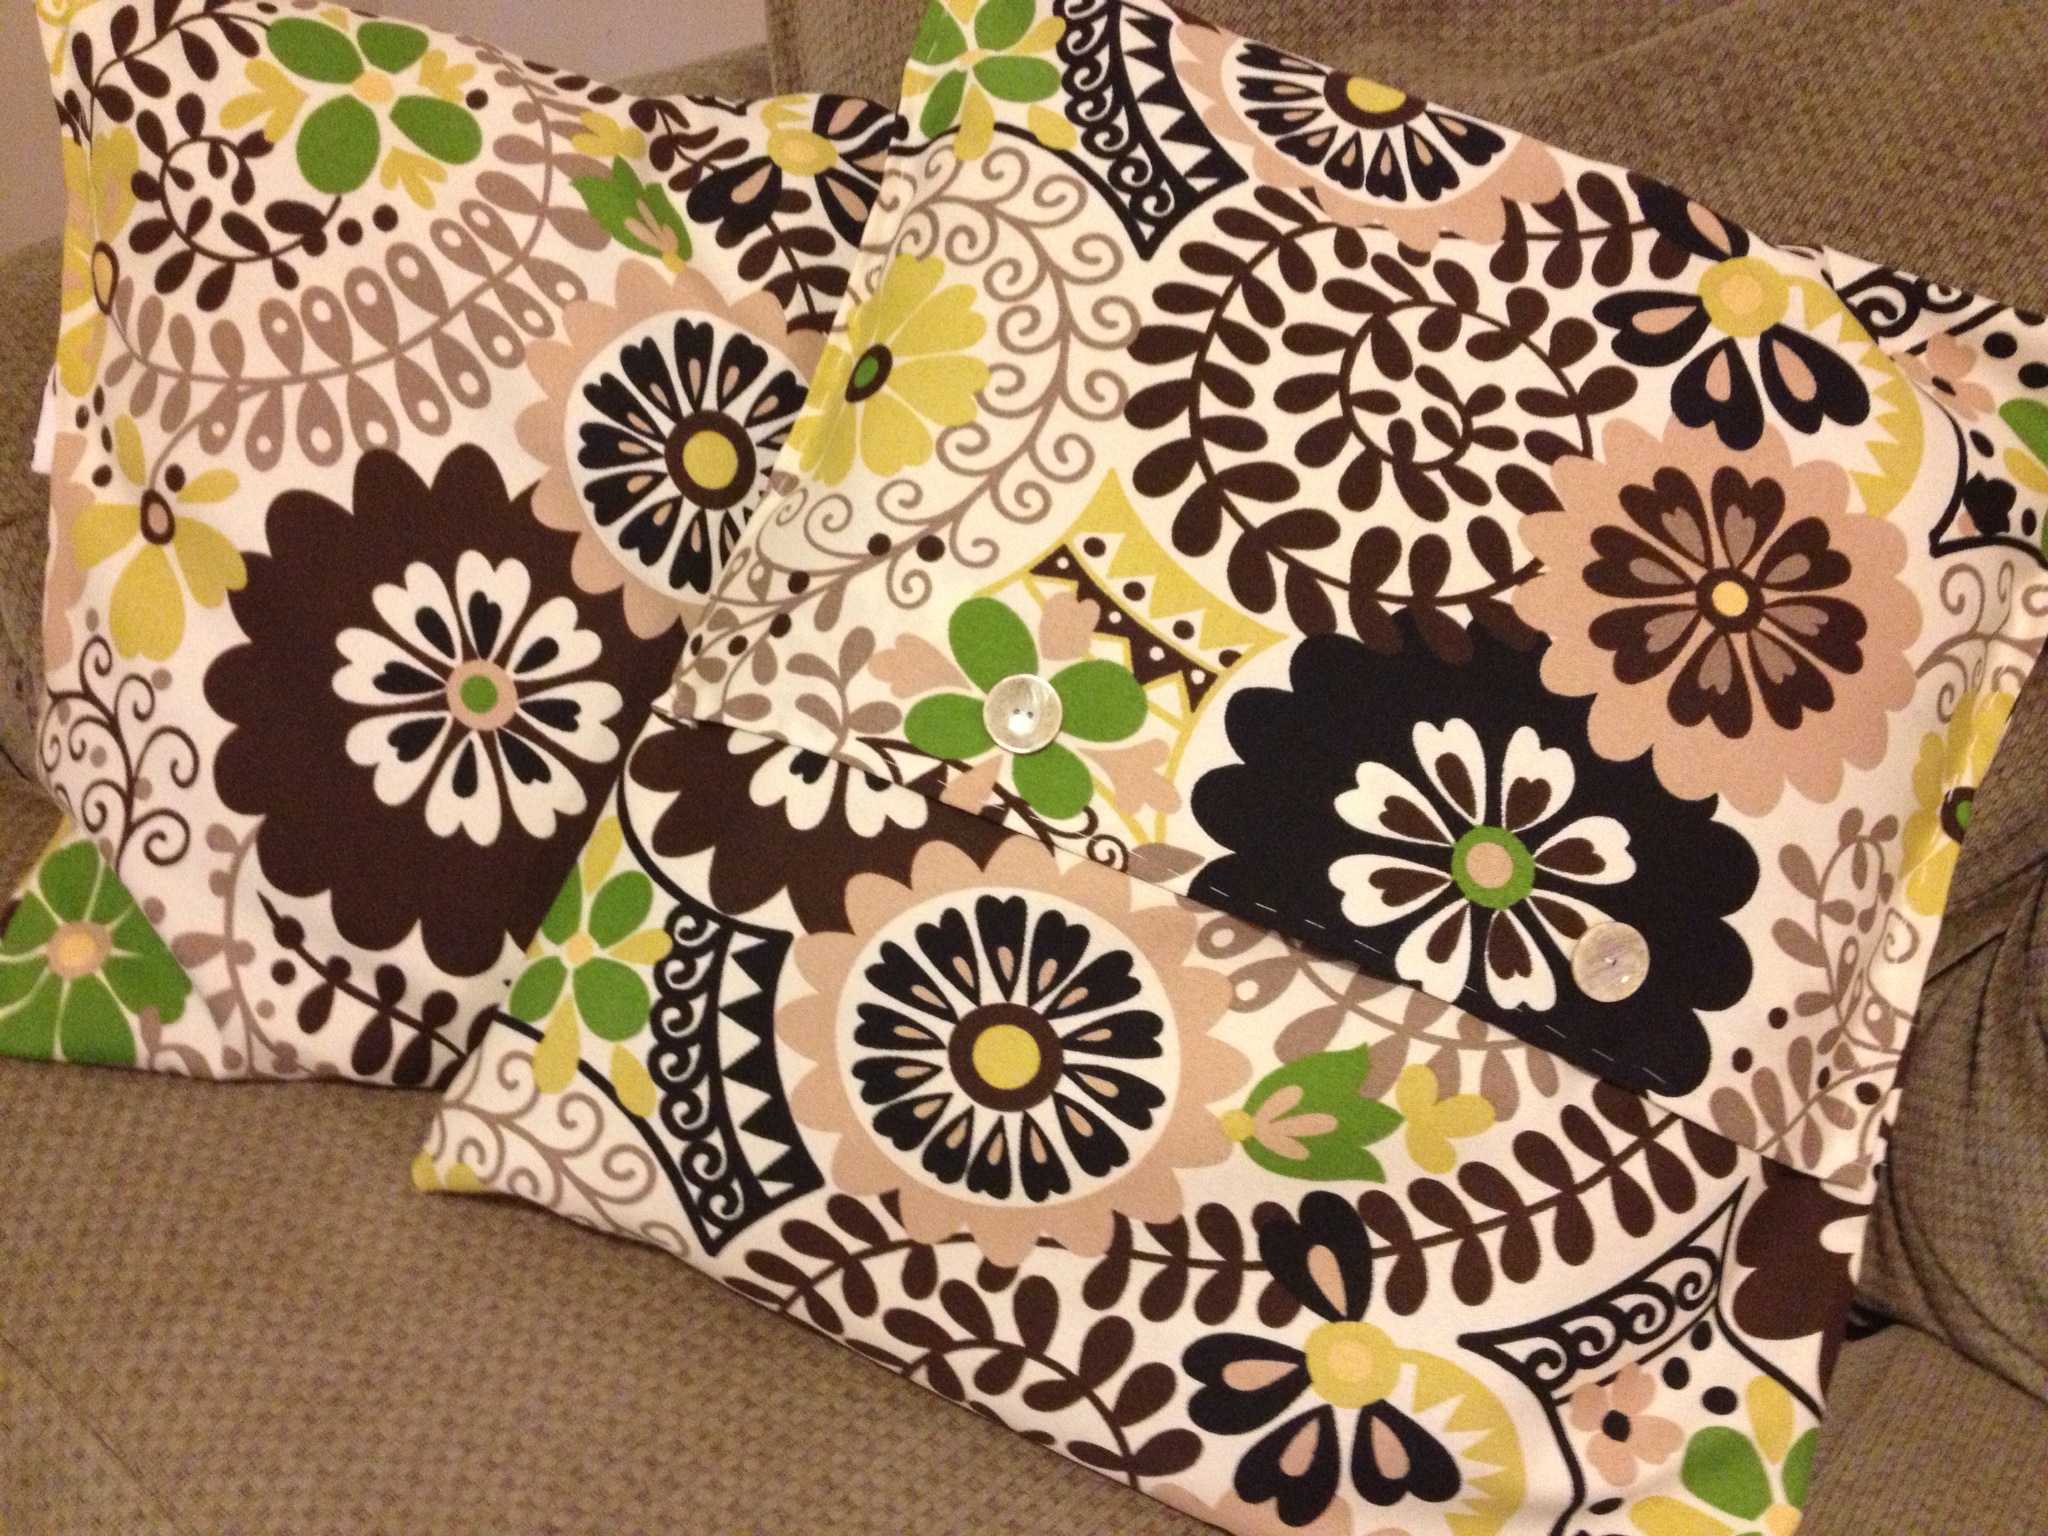
Pillow Makeover…Nuckles Edition
Pillow Makeover…Nuckles Edition
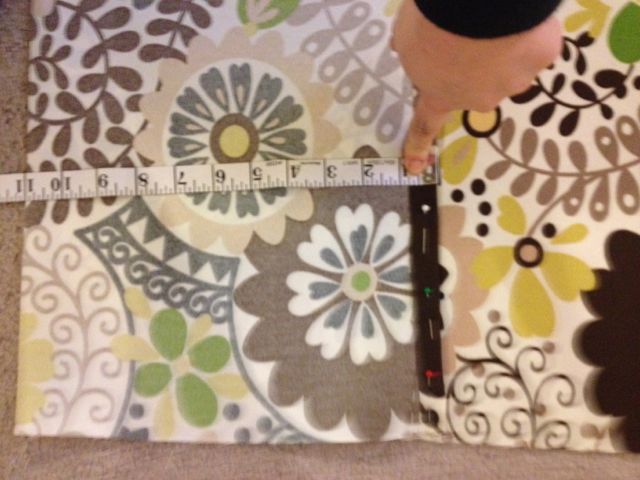
Originally I was planning on doing a no-sew pillow like a few that I had pinned on Pinterest….
I even went as far as buying the fabric glue. I got it home and thought to myself what are you thinking. You hate using fabric glue…why didn’t you at least by that stitch witchery stuff that irons on? I was mad at myself for even buying the glue because I hate using fabric glue and I have ever since as long as I can remember. I have not sewn something by hand other than fixing small holes in work pants and the constant plastic surgery from sewing up lil Miss Chloe’s toys. (Alex thinks this is silly and I should just toss them but he does not understand why I don’t just throw them away and that is simple…Chloe loves her toys and I love my Chloe. Chloe’s favorite toys make her happy therefore I am happy to sew them up instead of throwing them away and besides…she loves them. She even knows their names. If one that didn’t make the name cut that means she never played with them so I can just toss them if they get torn up. Mia on the other hand is not as worried about
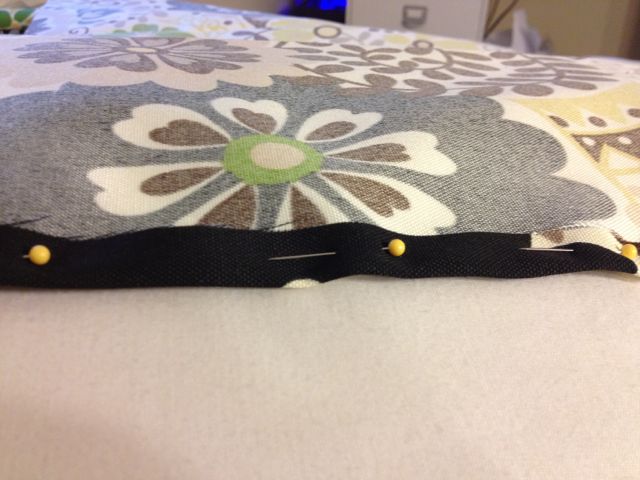
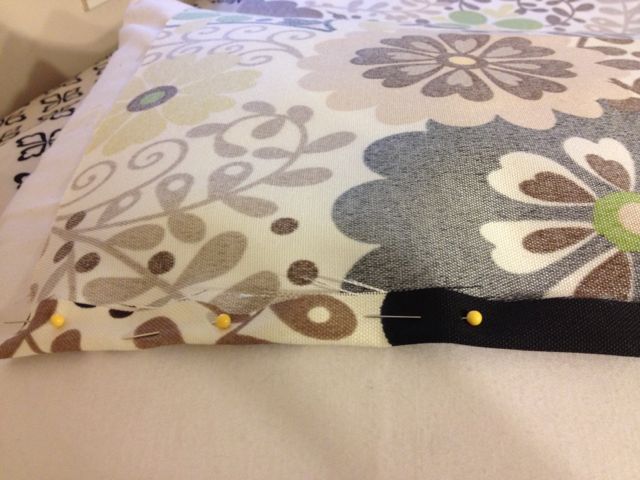
I had a little bit of a hard time nailing down the final measurements for this thing but I tried to perfect it by the last one and it seemed to have paid off. The pillow I used was an 18″ pillow. Let’s just say measurements is not really my thing and with this whole crafting thing measurements are pretty important. (I should have called my Grandma Bloesser right off the bat and asked her a million questions like I usually do but I wanted to do it on my own and I think she was a little tickled when I told her I sewed my pillowcases by hand!) I did sew 5 pillow cases and if you look in the picture there are only 4 pillows….I messed up on one and made it too tight and I went and bought an extra yard and did a last one because it was going to drive me crazy. The measurements I used was to cover an 18″ pillow.
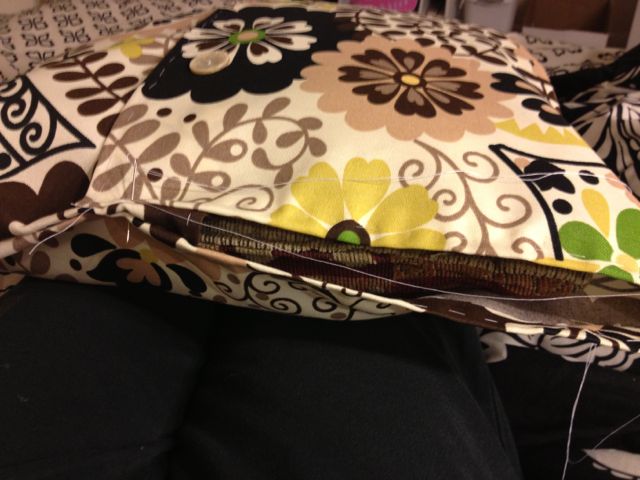
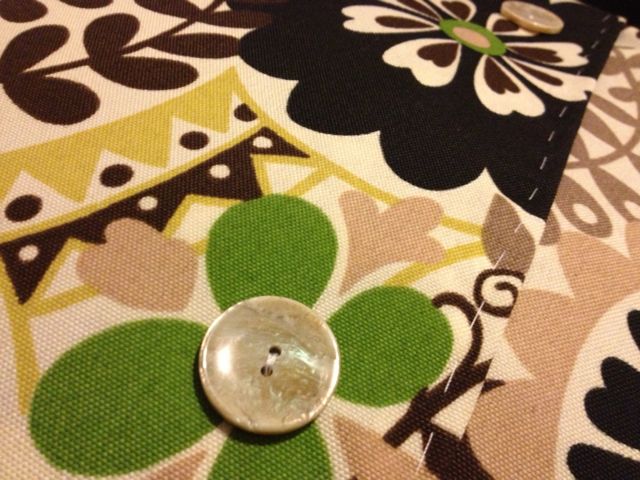
Cut a piece of fabric 42″ x 20″…hem the short ends to 1/4″ hem.Lay fabric design side up. Fold one side up and measure the crease fold in 11″. Pin the sides and sew about a 1/2″ down the side to form a pocket.Sew a 1/4″ hem on the sides left.After turning the pocket inside out, tuck the pillow in and tuck in the “envelope”. I ended up sewing my sides shut and tacking the “envelope” tag down and sewing buttons on it.Alex thought this was unnecessary but if I was going to hand sew 4 pillow cases…they were damn sure gonna have some pizazz!Alex’s biggest concern was the buttons would be uncomfortable and my answer was plain and simple…”then you lay your head on the other side..and they look cute..” I think they add character! 🙂
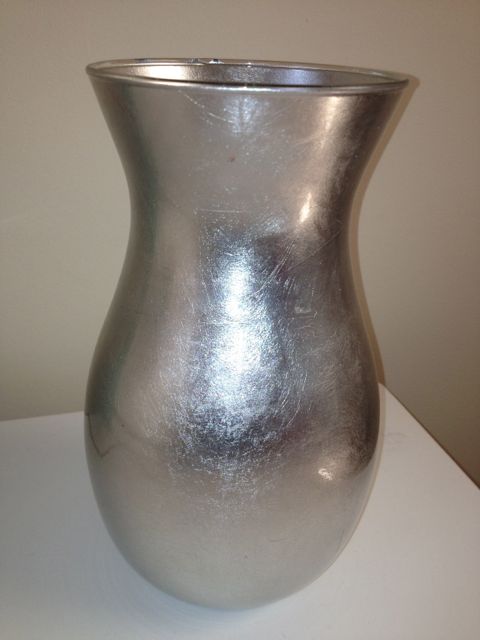
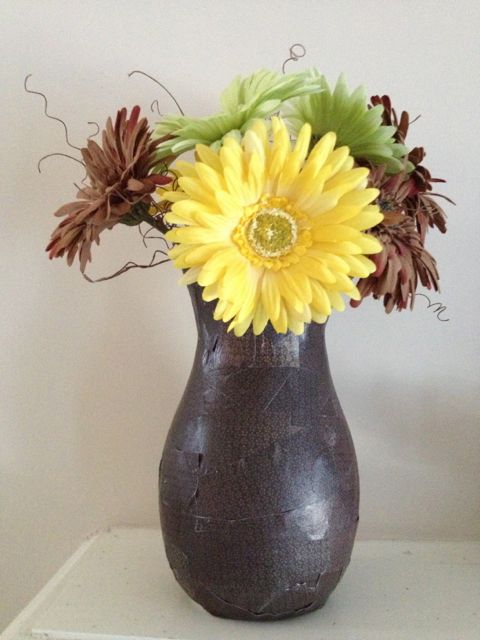
There was one more mini project that I worked on to pull the room together. I had a silver vase that went will all of my stuff from my apartment. I had tossed around the idea of painting it but I bought some mod podge from Michael’s a while back and I was itching to use it! I have never used the stuff before and I thought I needed to give it a shot. I found a scrapbook paper that was brown with little hints of flowers on it and cut it up into strips. I just painted the mod podge on with a paintbrush and pieced the scrapes on the vase and it turned out really cute!
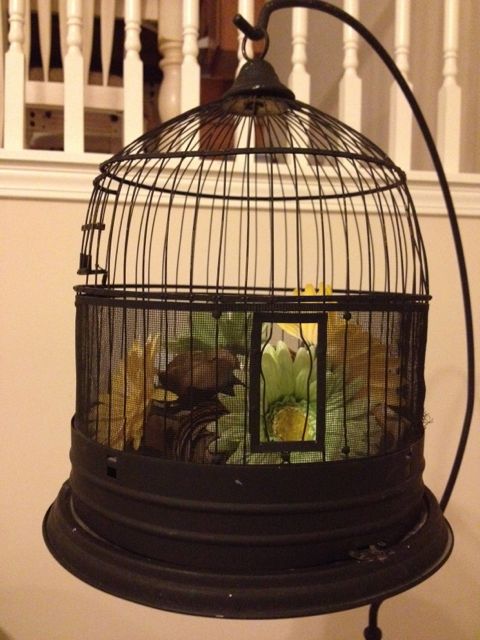
Vase before…Vase after! I love the textured look it gave the vase and I am debating on attacking some picture frames with it as well! Then I had to remind myself one thing at a time!I bought some extra flowers for my antique birdcage that my Grandma Bloesser gave me a long time ago!
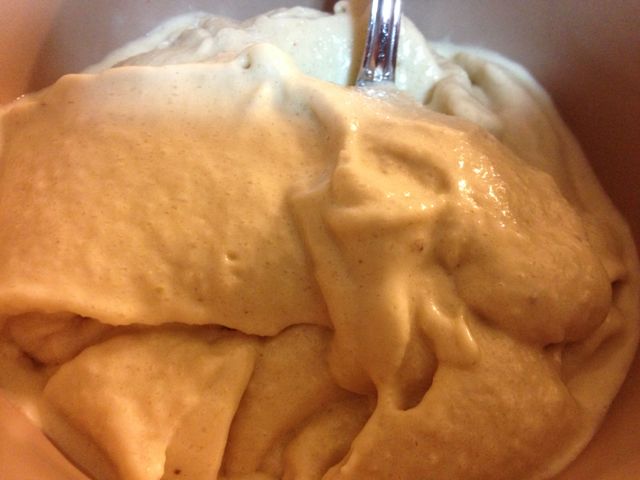
Ok so I did end up making this the other day but things have been busy so I have not had time until tonight! I have been busy with my current Pinterest project so stay tuned…I am hoping to finish it this weekend. Anyways back to the pb banana ice cream. I keep seeing posts of it called vegan ice cream but I am not vegan so I will just call it what it tastes like…and that’s pb banana ice cream! It even had the consistency of ice cream! I was not expecting that at all. It was like fresh soft serve ice cream. I added some peanut butter and ice, which was what most of the recipes of them called for. There were some that had additional ingredients….like honey, and almond milk….So I decided to try all of them…plus I did not understand why it kept saying just peanut butter and frozen bananas. I don’t know what kind of blenders these fools own but mine is a cheap one…and it needs the liquid for whatever you are mixing it. (Usually mine is mixing piña coladas!) I used almond milk but I think regular milk would have been just as good…maybe some greek yogurt maybe? That would be good…Note to self…next time use some greek yogurt to make frozen yogurt 🙂 I did see a few recipes that called for cocoa but I wanted to try the pb banana first.
I almost did skim milk instead of almond milk but since we had some on hand I decided to give it a try. I think with a little milk it would be just as good.Deliciousness! I think next time I will add some cocoa powder or maybe a few dark chocolate chips!
Peanut Butter Banana “Ice Cream”
Ingredients:
4 thinly sliced frozen bananas
ice
1 healthy scoop peanut butter
1 generous squeeze from Mr. Honey Bear
milk or almond milk to desired creaminess
I didn’t put specific amounts on everything because I usually just eyeball things like this. I was scared to put too much milk in because I was wanting more of an ice cream texture…not a milkshake. Honestly it made a decent helping. I would say it could serve 2-3 but you could do 4…I would suggest adding ingredients though because it was “seconds” worth by the end of the first bowl! I can’t imagine how bad an extra bowl would be…I mean its fruit and peanut butter! Alex was very impressed and it was well worth the effort! I chopped and froze my bananas overnight but I read in other recipes that you could chop them and freeze them for 3-4 hours so if you are planning on it…I would definitely make sure to get them thrown in the freezer in time. This dessert is absolutely making my recipe box to help with that killer sweet-tooth of mine!
It is funny because I feel like this weekend is my time to get some good blogging and reflecting in of my week. Because I want this to be my new lifestyle, I have to really look at myself hard in the mirror. It is not always a pretty sight no matter how I look at it, but no one is perfect right? I have let myself get into this unhealthy routine and I seem to be really hard on myself. You are your own worst critic right?? It was so nice out today that I actually ended up doing my long run today. Last week was 5 miles for my long run and it was the first time I had ran outside since it has been warm out. It was amazing. I ran it at a 10:04 pace and felt great when I was done.
This Week’s Training Schedule
As you can see, my long run this week was 6 miles. Today was not so pretty. I ran it in 60:27 but I did walk for a little bit. It was pretty rough and I think I was more interested in my time than I maybe should have been. I had a hard time breathing a few times and that does not happen to be a problem for me most of the time. I had to remind myself that it is only Week 4 and I am just starting to get back in the grove of things. I have been doing well finishing up my 4th Week of Couch to 13.1. Exercise-wise I feel like I am doing great. I am thinking about adding something else next week. Maybe a 10 Day Zumba Challenge. I might even try to do Insanity again with Alex. He has been doing P90 but I think he is wanting to switch it up. Insanity’s workouts are a lot shorter and are a lot easier to squeeze in the day. I really enjoy Zumba so I might do that before I commit to 60 days. I could blog about either though to hold myself accountable so I will sleep on it.
I am trying sot hard to be good but I have a killer sweet tooth so I am trying to satisfy that sweet tooth in me with healthy alternatives. I have been known to scarf down an entire bag of chocolates and I am not proud of it….but it is delicious almost every single time One of those bittersweet things in life ya know. I know its not good for me but I am going to stuff my face with it….we are all guilty of it. I can admit I have a problem and owning up to it is the first step right? I want to be able to eat things that satisfy one of those things I enjoy so much in life….call her the kid in me I guess. Alex is not a big guy on sweets so he doesn’t get it. I know that I am not the only one out there so maybe through my blog I can help inspire some people to start eating healthier. I can tell you I feel the best I have felt in years. I am turning 30 in April and I truly believe those that say your 30’s are the best years. I am not going to say I didn’t enjoy my 20’s either…because I sure as hell did! I hope that life only gets better from here.
And what you are mostly interested in hearing about is my Sweet Tooth Treat for the day! When I lost weight for my Bahama’s cruise I would sometimes have hot chocolate at night to help curve that chocolate craving I tend to get a lot! I have been drinking it since January when I am wanting something sweet. Trust me it works! Think about when you were a kid and how delicious it was to drink a cup of hot cocoa. Some of my best memories are hanging out with my cousins Miranda and Melanie along with my baby brother Jace…at my Grandma Bloesser’s house drinking hot chocolate, watching Dirty Dancing, and eating popcorn with strips of Velvetta cheese on it. (Which is one of my Grandpa Bloesser’s things…someday I will have to blog about how he has perfected the art of microwaving sausage and biscuits to perfection every time! I have told him before I wanted to record him doing it and put it on Youtube! Maybe now I will have to make it happen! lol)
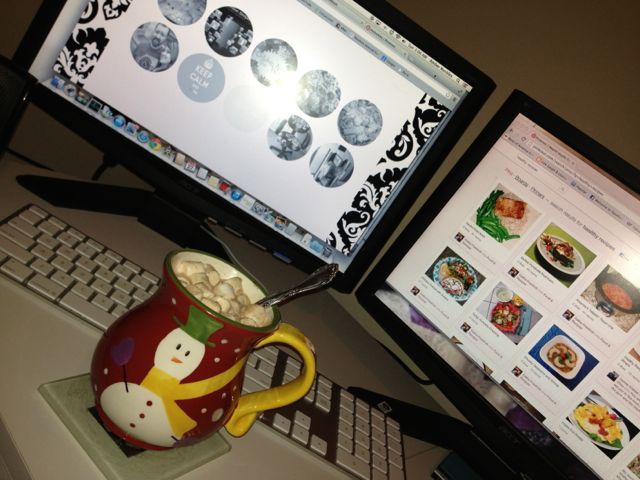
What I appreciate about hot chocolate is that I can make some with milk and mini marshmallows for only 4 points on Weight Watchers. And I never eat more than my 10 marshmallows! (They are 0 points so that means if I have 20 that is still 0 right??) I had been thinking about throwing some peanut butter in with my hot chocolate and when I finished warming my milk I decided it was the right thing to do.
Reese’s Peanut Butter Cup Hot Chocolate
Just add a spoonful of peanut butter to your hot chocolate. I highly recommend milk vs water but it really is a personal preference. The peanut butter flavor was delicious! It was perfection!!!
I was on Facebook earlier and a friend of mine posted a picture of this vegan ice cream made of frozen bananas and peanut butter made in a blender. I am definitely going to check this out tomorrow. As in…I have already chopped the bananas and threw them in the freezer! Tune in tomorrow folks! If there is one thing I could eat all day long it is ice cream so if I like this we may be in the clear for this new healthy eating habit! I saw this on Pinterest the other day and thought it sounded amazing but thought well if I want it right now I don’t have any frozen bananas. We bought more bananas at Hyvee today so we are set for this sweet treat tomorrow!!! It is funny, we always have fruit on hand but we have been going through 2 or 3 bundles of bananas each week! I eat apples with peanut butter like they are going out of style so I am interested in this frozen treat tomorrow! And now that I am looking at the clock and seeing that it is 4:30 am I am thinking it is time to get some sleep!
Reese’s PB Cup Hot Chocolate, Pinterest, and my blog?? I think so!!!!