Posted on Leave a comment

Tafoya Holy Moly Guacamole

This is the best guacamole recipe around!

I remember the first time I tried guacamole.  I was in college working at Applebee’s and just got a wild hair to try something new!  Boy, was I in for a surprise!  It was DELICIOUS!  I have always been a bit of a picky eater when it came to certain things.  It is amazing how much your taste buds change as you get older.  (I think part of it is just getting the courage to try something new!)  I did not have any desire to try guacamole based on the mere fact that it was green and could not possibly be good.

I am glad that I got the courage to try something new that day and will forever pile on the guacamole any time I have the chance!  Alex and I eat avocados for almost every meal.  He loves my tuna wraps and a half an avocado is the secret ingredient.  Just mix it with the tuna and some black pepper and you are good to go!

Alex found this recipe online and we have made a few tweeks to it.  It was adapted from Alton Brown’s guacamole recipe.  We are big fans of garlic at my house, so I always toss in a few more cloves than a recipe calls for.  I also added some fresh cracked pepper to kick it up a notch.  I have been told at many get togethers that I will be allowed back as long as I bring a big batch of guacamole!  This recipe is so easy and irresistible!
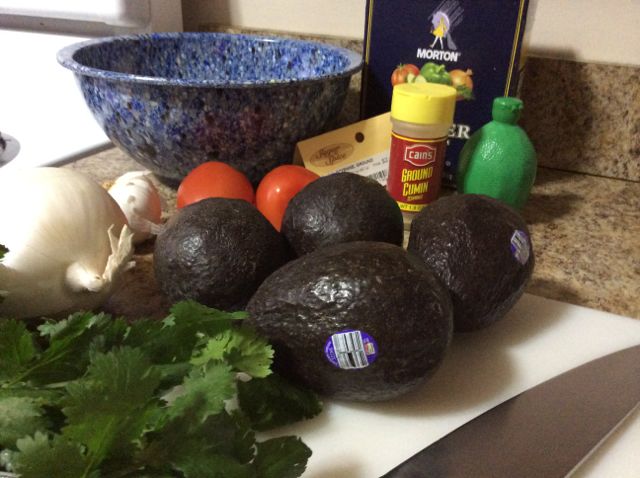
The lineup of ingredients.
After halving the avocados and giving them a coat of lime juice, add the cayenne,
After halving the avocados and giving them a coat of lime juice, add the cayenne, cumin, salt, and pepper.
Using a potato masher, mash up the mixture.
Add the fresh chopped onion, garlic, tomatoes, and cilantro by folding it in.
Let the guacamole set at room temperature for about an hour before serving.

Ingredients:

  • 4 avocados
  • 1 fresh lime
  • 1/2 teaspoon kosher salt
  • fresh cracked pepper to taste
  • 1/2 teaspoon ground cumin
  • 1/2 teaspoon cayenne 
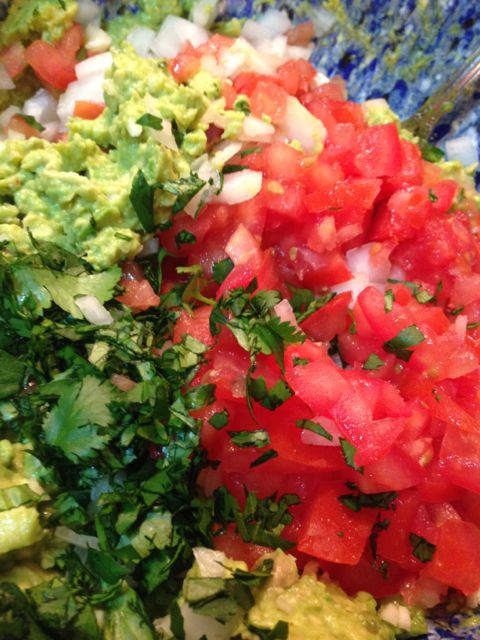
  • 1/2 medium diced onion
  • 3 diced roma tomatoes
  • 1 tablespoon chopped cilantro
  • 3 cloves minced garlic

Directions:

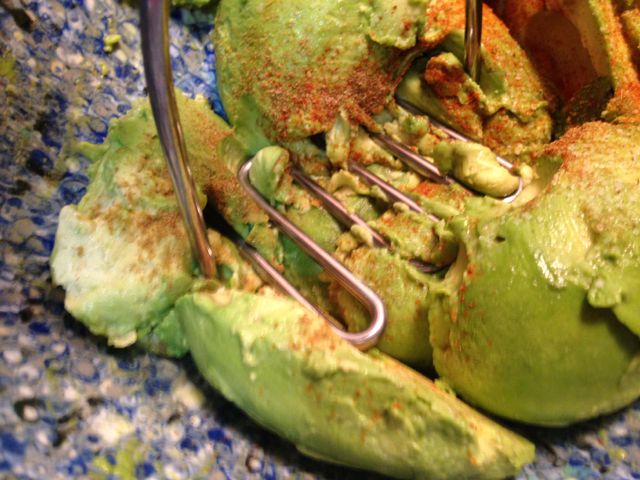
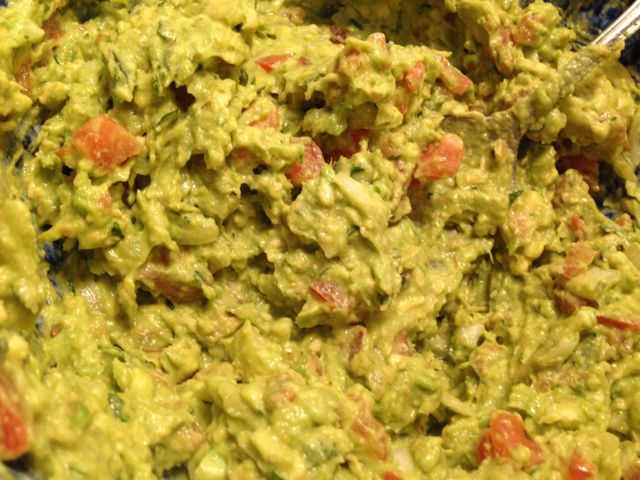
After halving the avocados and removing the pit, place the avocado in a bowl.  Squeeze the fresh lime on top and toss them around a bit.  Using a potato masher, mash the avocados.  Next, add the salt, cumin, cayenne, and black pepper stirring well.  Fold in the garlic, onion, tomatoes, and cilantro.  Let the guacamole sit for an hour or so at room temperature before serving.

Posted on Leave a comment

Halloween AND Fall Bunting

image
All ready for Halloween at our house!

I have the cutest fabric bunting now available in my Etsy shop!  I picked out some adorable fabrics from fabrics.com that go together perfectly!  What I love about shopping on this site, is that you can add fabrics to the design wall to match them together.  I just went through and added ones I liked, then was able to see a visual of how they would look together.

This bunting is unique because I have made it reversible to hit a holiday and a season for when the holiday is over!  I love that it is dual purposed, so you can use it longer.  You simply turn the banner around and voila!  New decor!

The Halloween side features owls, spiders, chevron, polka dot, and stripes.
Fall owls, fruit, chevron, polka dots and fall leaves are the perfect fall back drop that can be used all through November!
Here is a visual of the banner flipped.  Love the apple and pear fabric for fall!
Here is a visual of the banner flipped. Love the apple and pear fabric for fall!
Just flip the Halloween side to the back and you have fall!

Please leave me comments on what you think about my latest banner.  Are there other seasons you would like to see in my shop?  Maybe Christmas with Winter or Spring with Valentines?

Posted on Leave a comment

18″ Pillow Covers

I am not sure if you have shopped for pillows recently, but the cost for fun throw pillows in stores is beyond ridiculous.  I have came across pillows that range from $12-20 PER PILLOW!  What I love about these pillow covers, is that I spent $15 on some fun material and matching thread for all 4 pillows!  I also love that I had the pillow inserts already, so I did not need to buy any.  Can you say upcycling?!  I did a tutorial a couple years ago on envelope pillow covers.  Our couch was in serious need of a face lift!  The covers that I made previously were sewn by hand and were literally falling apart.  I decided since I now have a sewing machine, there is no excuse for not getting them redone.  Plus I was getting sick of looking at that floral print!  It was time for something new!

Here is a picture of the original pillows that came with the couch.  Can you say yuck?  lol
Here is a picture of the original pillows that came with the couch. Can you say yuck? lol
Here are the pillow covers I made a few years ago by hand.
Here are the pillow covers I made a few years ago by hand.  Click the picture to see the tutorial.  It is much easier with a sewing machine!
I have never been more in love with navy!  I grabbed one yard of each fabric to make 4 total pillows.  Love the way they turned out!
I have never been more in love with navy! I grabbed one yard of each fabric to make 4 total pillows. Love the way they turned out!

I used the same method as I did last time I did these pillows, but I changed the measurements up a bit.  Instead of doing a 42″ x 20″ piece, I did 42″ x 19″ for a little more of a snug fit.  Also, when pinning in the short sides, I ironed 1/4″ over and folded it another 1/4″.  The best part was using my sewing machine instead of sewing them by hand!

Instead of leaving the flap open, when I pinned the right sides together, I sewed along the entire edge.  The pillows were easily inserted and looked way better than the ones I did before!  You can see how clean it looks in the picture!
Instead of leaving the flap open, when I pinned the right sides together, I sewed along the entire edge.  The pillows were easily inserted and looked way better than the ones I did before! You can see how clean it looks in the picture!

I am so pleased with the way these turned out!  It definitely gave a breath of fresh air to our living room!  They were so easy and quick to make!


Posted on Leave a comment

Baby Lennyn’s Giraffe Themed Shower

Ashlee standing by the cake table.
Ashlee standing by the cake table.  Doesn’t the fabric bunting look fabulous!

My amazing friend Ashlee is expecting her first baby!  We threw her a shower last weekend.  I created the invites and decor for the event, all which can be purchase through my Etsy Shop!

image
Baby Lennyn’s crib is all ready for her arrival! Isn’t the giraffe picture Ashlee found too cute!

I started with creating the invitations to match her nursery.  She had picked out the most adorable giraffe/zebra themed bedding set!  The bedding had a lot of creams, browns, golden yellows, and orange, so I decided to go with a golden yellow and brown for the invitations.

We included a diaper raffle card in the invitations.  Anyone who attended the shower and brought a pack of diapers was entered into a drawing for a prize.  I need to ask her how many packs she ended up with, but I know we definitely gave her a good start!
The cake lady even made the cake match the invites!  Too sweet!
The cake lady even made the cake match the invites! Too sweet!
These orange burlap flowers really made the diaper cake pop!

I made one of my diaper cakes for a large centerpiece.  Originally, I spent an hour making handmade burlap flowers, but they did not look good with the brown ribbon, so I used these orange burlap flowers instead.  I cannot take credit for those!  I love the way they stuck out on the cake.

Ashlee in front of the gift table.  See the paper medallions hanging above the table?  Check back for a tutorial on how to make these!  They are too much fun!
Ashlee in front of the gift table. See the paper medallions hanging above the table? Check back for a tutorial on how to make these! They are too much fun!
I cannot believe I didn't get a picture of the fabric bunting that we hung above the entrance of the party.  It was so festive!  Click the link to order your's today!  I can make one to match any nursery!
I cannot believe I didn’t get a picture of the fabric bunting that we hung above the entrance of the party. It was so festive! Click the link to order your’s today! I can make one to match any nursery!
Close up shot of the baby's name banner.  I love the way she spells Lennyn!
Close up shot of the baby’s name banner. I love the way she spells Lennyn!
We had an amazing shower with an amazing group of fabulous ladies!  We are so excited to meet you Lennyn!
We had an amazing shower with an amazing group of fabulous ladies! Congrats Ashlee!  You will be the best mama!  We are so excited to meet you Lennyn!