Posted on Leave a comment

Maternity Shoot

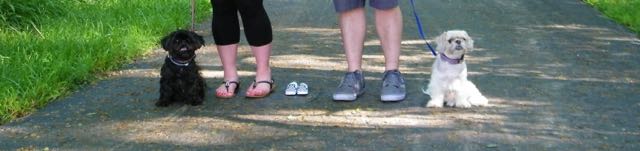
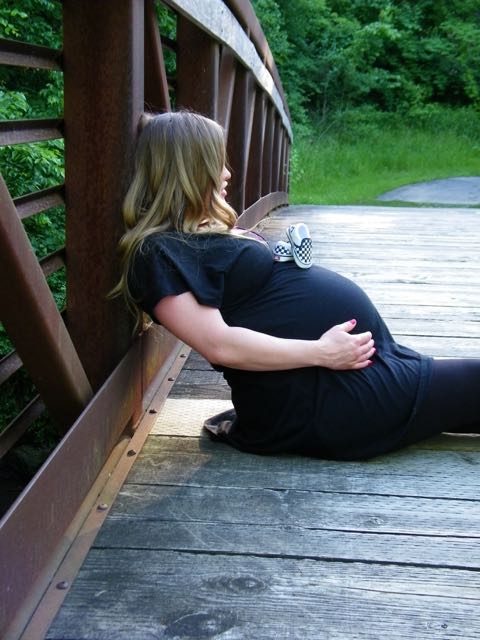
Alex and I wanted some pictures together with my baby bump before little Miss Avery decides to make her debut! Luckily, I have an amazing friend that takes good pictures, so I asked her if she would mind coming over one day and take some for us. Thank you Amanda!! (PS I had someone ask me today if you did it as a side job…just something to think about!) She did an awesome job directing us into poses and everything! So before you go out and spend a fortune on a maternity shoot, get on Pinterest for ideas of what you want and find a friend that likes to take pictures! I am so pleased with the way they turned out!

Love this one!  Minus my chubby swollen feet it is perfect!
Love this one! Minus my chubby swollen feet it is perfect!
The bendy trail really makes this picture.  Have I mentioned how much I love this trail by my house?
The bendy trail really makes this picture. Have I mentioned how much I love this trail by my house?
Heart on tummy!  Gotta love Pinterest!
Heart on tummy! Gotta love Pinterest!
This heart one is fun too.
I wish you could see my bump in this shadow more, but it turned out cute.
I wish you could see my bump in this shadow more, but it still turned out cute.
Had to bring the pups in on the fun!
This one was inspired on Pinterest.  I think it turned out cute!
This one was inspired on Pinterest. I think it turned out cute!
Family shot!
Family shot!
I found this pose on Pinterest as well.  I love it!
I found this pose on Pinterest as well. I love it!
This one might be my all time favorite.
We happened to hit the bridge at perfect sunlight here.  Amanda knows how to work that camera!
We happened to hit the bridge at perfect sunlight here. Amanda knows how to work that camera!
Love this one!
Love this one!
Love the bridge pictures.
We had a few of these, but I was bummed that I was holding the sono upside down.  I still had to share though!
We had a few of these, but I was bummed that I was holding the sono upside down. I still had to share though!  She is head down as of know so oh well!
A little flirting on the bridge!
Smooches!
Smooches!
Giving Avery some daddy kisses!
Vans on the belly!
Vans on the belly!
Love this one!
Love this one!
I just cut out some letters on my Silhouette for these.  Love this!
I just cut out some letters on my Silhouette for these. Love this!
Both of us in this one!
Can't see the bump, but love this one!
So much fun!
Love this one!
Love this one!
This one might be one of my other favorites!  LOVE!
This one might be one of my other favorites! LOVE!
So cute!
So cute!

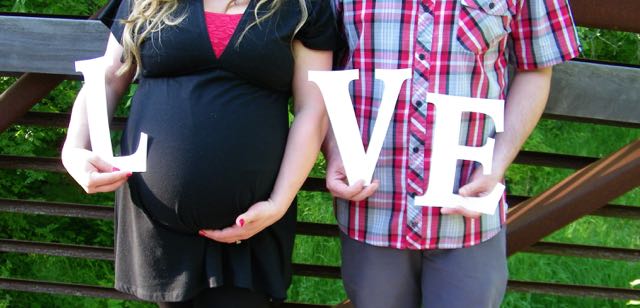
I am so happy we took these.  They will be fun to share with Avery when she is older!  Check back for pictures of her soon!  She is due in about 2.5 weeks, but this mama wouldn’t mind meeting her a little early!!


Posted on Leave a comment

DIY Patchwork Hot Air Balloon

I have been pinning hot air balloon decorations like crazy and am officially obsessed!! There are so many good tutorials out there on how to make a hot air balloon from paper lanterns. Originally, I planned on using the left over fabrics from my hot air balloon mobile to just make 8 full panels around the lantern, but the lantern was pretty big and when I tried to trace a pattern for it, I didn’t have enough fabric left. Instead of going out and buying more fabric, I thought I would try something a little more outside the box!

I grabbed my pinking shears and started cutting out squares, rectangles, and triangles with all the left over coral, mint, and gray fabrics I have incorporated into the room. Then I grabbed my handy dandy ModPodge and went to town!  It was pretty easy but very messy!

DIY Patchwork Hot Air Balloon

Materials:

Fabric lantern (I got a big one from Ikea)

Scrap fabric cut into squares, rectangles, and triangles using pinking shears

ModPodge

Sponge brush

A bucket or basket

Coordinating ribbon or cord

Hot glue gun

Instructions:

Here is what you need to get started.  Cut scrap fabric into squares, rectangles, and triangles.
Here is what you need to get started. Cut scrap fabric into squares, rectangles, and triangles.
Layer your pieces on top of ModPodge and put a layer of ModPodge on top as well to seal it.
Add a bucket with cord or ribbon using hot glue to secure everything together.  I added some washi tape  bunting because I am obsessed with bunting!!
Add a bucket with cord or ribbon using hot glue to secure everything together. I added some washi tape bunting because I am obsessed with bunting!!


Posted on Leave a comment

DIY Hot Air Balloon Art

I just finished making the most adorable hot air balloon art to hang up in Avery’s nursery!  It was so easy and too fun not to share!  I have been picking up buttons here and there in coral and mint to match.  Other than that, this project was just materials that I had on hand!

DIY Hot Air Balloon Art

Materials:

buttons

scrap burlap

fabric ModPodge

sponge brush

string, cord, or ribbon

white paper

frame

hot glue

washi tape

Instructions:

Cut out a basket out of burlap.  I just grabbed the scissors and started cutting.  Then I used fabric ModPodge to keep it from fraying.  Sit it aside and let it dry.
Cut out a basket out of burlap. I just grabbed the scissors and started cutting. Then I used fabric ModPodge to keep it from fraying. Put it to the side and let it dry.
Buttons!!!!!
Grab a variety of buttons and a glue gun!
Then I just glued the buttons around in a hot air balloon shape.  When it looked full enough, I just added some cord and some pennants made from washi tape!
This was so simple to make!  I glued the buttons around in a hot air balloon shape. When it looked full enough, I just added some cord and some pennants made from washi tape!