Posted on Leave a comment

Gift for Baby Case

Words cannot express how exciting it is when the time comes to welcome a new baby into this world. Family is the most amazing gift we have in life and I am so blessed to have such amazing people in mine! My cousin Melanie has been busy getting ready for her little boy’s debut.

Melanie and I celebrating our great grandma's birthday in March.
Melanie and I celebrating our great grandma’s birthday in March. Check out that lil baby bump!
My mom, Melanie, me, Grandma Bloesser, and Great Grandma Chilson

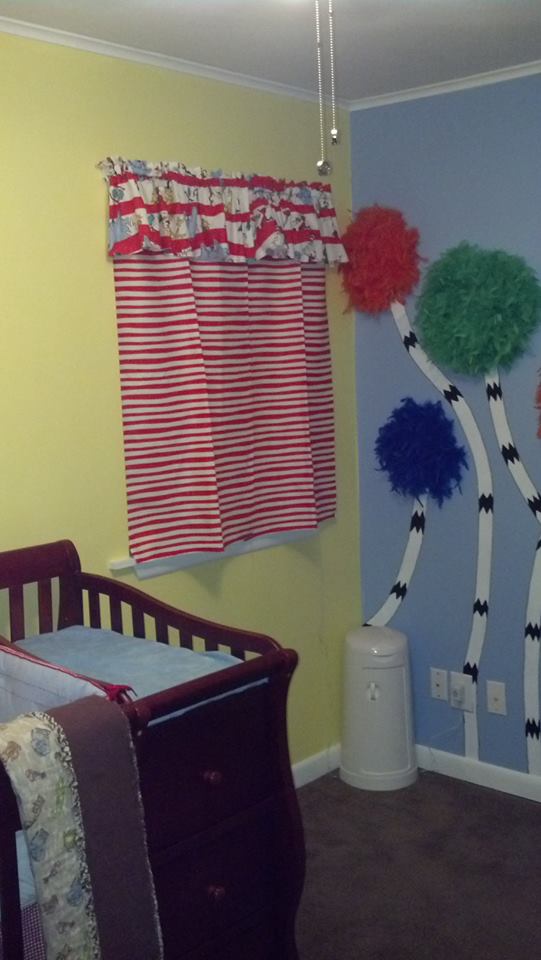
Melanie has the sweetest baby room ready to bring that baby home to!  She decided on a “Dr. Seuss” theme nursery, which I LOVE! What is not to love about Dr. Seuss??  His numerous stories, cartoons, and riddles are so stimulating and magical!  (In fact, we watched a Dr. Seuss movie in school the other day and it was so fun to watch the kids expressions while they were watching it in amazement!)

Here is a little sneak peak of the nursery...
Here is a little sneak peak of the nursery…
The Truffula Trees!
The Truffula Trees!

It was only fitting that I came up with a project for my newest family member!  I was excited when Melanie told me she was doing Dr. Seuss because last school year I taught my second graders to draw Dr. Seuss by following a link on Pinterest.  Turns out, it really was not that hard and mine turned out pretty good!  I was even inspired to try to start drawing some in my free time.

So I took a stab at it again...This time with an attempt to juggle little Case's name!
So I took a stab at it again…This time with an attempt to juggle little Case’s name!
The frame had to be over the top, so I got out the paint and mod podge...
The frame had to be over the top, so I got out the paint and mod podge…
Topped off with the most perfect quote from the Dr. himself!

And guess who decided to make an appearance yesterday!…

Case Wayne Brewer 8lbs 7 oz. 20 inches long

Meet the Brewer’s

Justin, Maddy, Melanie, & Case Brewer


Posted on Leave a comment

Stuffed Peppers

I am not sure words can describe how much I am enjoying working part time this summer!  Eventually when I have little ones, I will probably stay home for the summer.  For now…I am working on paying off a credit card, so it is very necessary to work over the summer to bring in some extra funds to get that bad boy knocked out!  Anyways, I am off by 12:30ish Monday through Thursday and have 3 day weekends and have had so much more time to get things done.  I have been impressed with my ability to keep the housework going and having time to do all the things that I love!

Tonight I made stuffed peppers for dinner.  When I went to the store, I had planned on making quinoa to mix in and managed to grab some couscous instead.  I have always wanted to try cooking couscous and tonight I did, even if it was by accident!  They turned out so good and were really easy!  I am glad I made enough for left-overs and they were very filling!

Ingredients:

Ingredients
Ingredients needed:  couscous, ground turkey, Hunts Chunky Vegetable, garlic, medium sized onion, 4 peppers, salt & pepper, and cheese (not pictured).

Instructions:

Cut the tops off the peppers and hollow out the seeds and core.
Brown the turkey with minced onions and 2 minced garlic cloves.  Add the Hunts Pasta Sauce.  Simmer on low for 15 minutes.
Brown the turkey with minced onions and 2 minced garlic cloves. Add the Hunts Pasta Sauce. Simmer on low for 15 minutes.
Cook couscous according to packaging.  The one I used was garlic and olive oil...it was delicous.
Cook couscous according to packaging. The one I used was garlic and olive oil…it was delicous.
I started with a layer of meat sauce.
Then I packed in the couscous about 3/4 the way up.
Then I topped the couscous with more meat sauce.
Top the peppers off with some cheese.
Top the peppers off with some cheese.  Wrap some foil around the baking dish and bake on 375° for one hour or until peppers are tender.
Finished product!  So yummy!
Finished product! So yummy!


Posted on Leave a comment

Origami Dog

This year for summer school, we are traveling to a different place in the world. This week we went to Japan! We have been planning a fun art project each week. I decided what better chance to teach the kiddos a little origami!  I did do this with small groups.  I would recommend this because Ms. Nuckles ended up doing a lot of helping!  My advice would be to pull small groups to a table or have a helper (or 2) help out if doing this in whole group.  Let’s just say if I had a dollar for every time I had a 1st grader say, “Like this?  Like this Ms. Nuckles”!  It was fun!  We talked about what we would name the dogs.  They had a lot of fun with it and so did I!

Start out with a piece of construction paper.
Fold one corner over to make a giant triangle.
Cut out the triangle.  (We had some extra time after we were finished and I let the kiddos make some bookmarks out of the piece we cut off)
Cut out the triangle. (We had some extra time after we were finished and I let the kiddos make some bookmarks out of the piece we cut off)
Point the triangle towards you like shown in the picture.
Fold down one side to make the first ear.
Do the same to the other side.
Flip the paper over and fold the tip back
Flip the paper over and fold the tip back to make the chin.
There is your dog!  Have the kids make a face on their dog.
There is your dog! Have the kids make a face on their dog.
I named mine Spot!  The kids had fun.
I named mine Spot!


Posted on 13 Comments

Crate Seats and Benches

My library corner in my classroom.
Teacher table area with crate seating!

I get more compliments on my crate seating and benches in my classroom.  I made these last year and would be lying if I said they were easy!  They did take a lot of work but once they were finished, they turned out great!  The first problem I came across was finding good sturdy milk crates.  The ones from Walmart are not built as sturdy as the ones an actual dairy uses.  I ended up calling around to a few places and Anderson Erickson Dairy were kind enough to donate the milk crates for my classroom!  It turns out, they are the dairy that my school gets their milk from!

A HUGE THANK YOU to Anderson Erickson Dairy in Kansas City, KS for helping me out with materials!
Also a HUGE THANK YOU to Home Depot for helping me cut the wood to the sizes I needed!

Materials:

sturdy milk crates

wood

zip ties

drill

adhesive spray

memory foam

stapler

fabric

fabric drawers

Instructions:

Alex had to help me a lot with the measurements for this.  Honestly, it will vary depending on the exact measurements of the milk crates.  The guys at home depot cut the squares for the individual seats for me.  This helped out a lot!  When I got them home, Alex helped me figure out how to attach the cushion to the crate.  We sat the crates on top of the wood and penciled dots where I needed to drill.  I used these holes to attach the wood to the crates with zip ties.   IT IS VERY IMPORTANT TO PUT THE ZIP TIES IN READY TO GO, BEFORE YOU PUT THE MEMORY FOAM ON TOP. This will allow you to cover it with fabric and then attach the cushion to the crates. (Make sure to staple far enough in that you will not have kiddos cutting their fingers on staples!) Cut the memory foam to an inch longer on each side to give it a little cushion on the side. Spray the adhesive to help the foam stick while you staple the fabric on. AGAIN make sure to pull fabric away from the edge to make sure staples are not sticking out. Safety Safety Safety! After attaching the fabric, line up the zip ties and pull tight to attach the cushion to the crate.

Next add a drawer for extra storage!  I store my math manipulatives in the benches and familiar reads at the teacher table for the kids to read while I am getting the rest of the class started on work.
Next add a drawer for extra storage! I store my math manipulatives in the benches and familiar reads at the teacher table for the kids to read while I am getting the rest of the class started on work.  I ended up finding them during a good sale at Target for like $5.99 a piece!  Otherwise, they can tend to be pricey!
For the bench, just line up the desired amount of crates on their sides and zip tie them sideways first.  Once they are attached, place them on top of the wood to make the holes for the zip ties to hold the wood down.  IT IS VERY IMPORTANT TO PUT THE ZIP TIES IN READY TO GO, BEFORE YOU PUT THE MEMORY FOAM ON TOP.  This will allow you to cover it with fabric and then attach the cushion to the crates.  (Make sure to staple far enough in that you will not have kiddos cutting their fingers on staples!)  Cut the memory foam to an inch longer on each side to give it a little cushion on the side.  Spray the adhesive to help the foam stick while you staple the fabric on.  AGAIN make sure to pull fabric away from the edge to make sure staples are not sticking out.  Safety Safety Safety!  After attaching the fabric, line up the zip ties and pull tight to attach the cushions.
For the bench, just line up the desired amount of crates on their sides and zip tie them sideways first. Once they are attached, place them on top of the wood to make the holes for the zip ties to hold the wood down. IT IS VERY IMPORTANT TO PUT THE ZIP TIES IN READY TO GO, BEFORE YOU PUT THE MEMORY FOAM ON TOP. This will allow you to cover it with fabric and then attach the cushion to the crates. (Make sure to staple far enough in that you will not have kiddos cutting their fingers on staples!) Cut the memory foam to an inch longer on each side to give it a little cushion on the side. Spray the adhesive to help the foam stick while you staple the fabric on. AGAIN make sure to pull fabric away from the edge to make sure staples are not sticking out. Safety Safety Safety! After attaching the fabric, line up the zip ties and pull tight to attach the cushions.