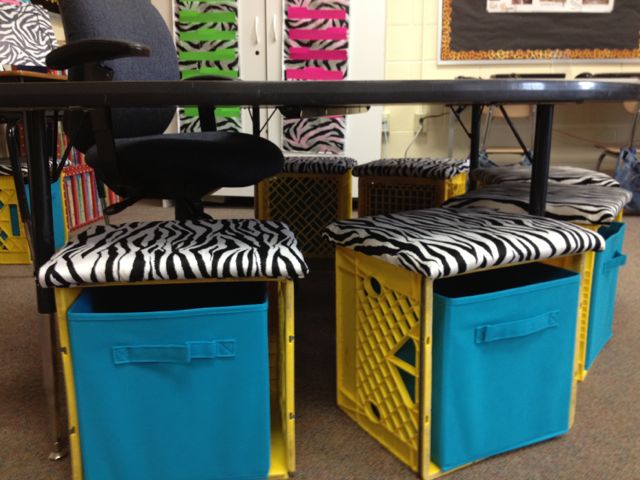


I get more compliments on my crate seating and benches in my classroom. I made these last year and would be lying if I said they were easy! They did take a lot of work but once they were finished, they turned out great! The first problem I came across was finding good sturdy milk crates. The ones from Walmart are not built as sturdy as the ones an actual dairy uses. I ended up calling around to a few places and Anderson Erickson Dairy were kind enough to donate the milk crates for my classroom! It turns out, they are the dairy that my school gets their milk from!


Materials:
sturdy milk crates
wood
zip ties
drill
adhesive spray
memory foam
stapler
fabric
fabric drawers
Instructions:
Alex had to help me a lot with the measurements for this. Honestly, it will vary depending on the exact measurements of the milk crates. The guys at home depot cut the squares for the individual seats for me. This helped out a lot! When I got them home, Alex helped me figure out how to attach the cushion to the crate. We sat the crates on top of the wood and penciled dots where I needed to drill. I used these holes to attach the wood to the crates with zip ties. IT IS VERY IMPORTANT TO PUT THE ZIP TIES IN READY TO GO, BEFORE YOU PUT THE MEMORY FOAM ON TOP. This will allow you to cover it with fabric and then attach the cushion to the crates. (Make sure to staple far enough in that you will not have kiddos cutting their fingers on staples!) Cut the memory foam to an inch longer on each side to give it a little cushion on the side. Spray the adhesive to help the foam stick while you staple the fabric on. AGAIN make sure to pull fabric away from the edge to make sure staples are not sticking out. Safety Safety Safety! After attaching the fabric, line up the zip ties and pull tight to attach the cushion to the crate.


