Posted on 4 Comments

Vinyl Window Decal

So back in May, I ran my first half marathon.  It was a crazy time to do it, as school was coming to an end and my life was a little hectic!  It was a huge accomplishment for me as a runner.  I can remember when I ran my first 10K and it was the beginning of July and hot hot hot! I thought to myself…there is no way in hell I would be able to run a half marathon…and I did it!  I would love to run a full marathon one of these days but one step at a time!

Click here to read about my half marathon!

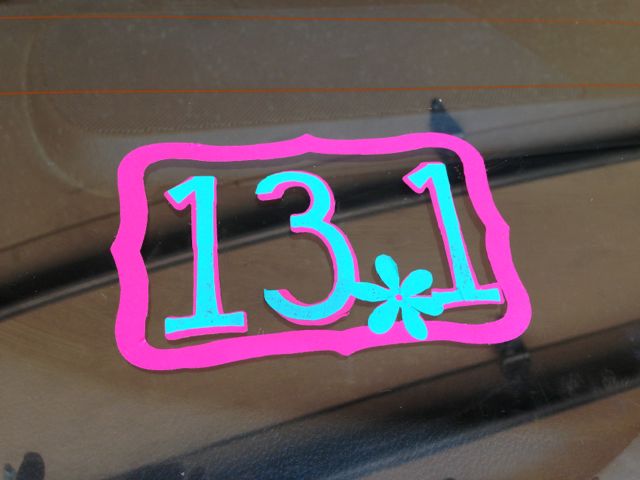
I wanted a decal for my car window before I even finished the race!  I can remember going into Gary Gribble’s to grab some chews for my race and I was already browsing the decals while waiting in line. The only one they had in the half marathon were just black and white and BORING! So then I resorted to shopping on eBay…I just could not find one that I really liked, so once I started playing with vinyl, I decided that I would take matters into my own hands! I fired up Cricut Craft Room and started playing around with different fonts and decided on a dual layered decal to kick it up a notch.  I recently purchased some 12″x12″ sheets of colored vinyl to play with and I figured this was the perfect time to break them out! It is funny because after my first vinyl project, I was irritated and set on the fact that I would never mess with it again!  Now I keep dreaming up ways to use it!  I will still say that it is a pain but I am loving the final products!

After weeding out the extra vinyl, I used Glad Press & Seal as transfer paper.  I think it is easier to put the layers together before placing it on the surface.  This is what it looked like before applying the teal to the pink shadow.
After weeding out the extra vinyl, I used Glad Press & Seal as transfer paper. I think it is easier to put the layers together before placing it on the surface. This is what it looked like before applying the teal to the pink shadow.
My original 13.1 window decal made by yours truly!
Final product!
Final product!


Posted on Leave a comment

Blueberry Banana Muffins

I absolutely love it when I have a few bananas that get a little too ripe to eat alone.  I have never been a huge banana fan in general, so I have to make them exciting to trick myself into eating them.  To tell you the truth, they are kind of growing on me!  I had some blueberries left from my amazing friend Katie that brought them from a blueberry patch they visiting in Tulsa.  If there is one muffin that I love…it has to be blueberry!   I decided to give a banana blueberry muffin a shot and boy am I glad I did!  They were DELICIOUS!!!  Alex couldn’t stay out of them, so that told me they had to be good!

I love this recipe because I happened to have everything on hand!  I did use Hyvee Greek yogurt with blueberries on bottom because I did not have any plain greek yogurt, but I think it added some character!
I love this recipe because I happened to have everything on hand! I did use Hyvee Greek yogurt with blueberries on bottom because I did not have any plain greek yogurt, but I think it added some character!

Ingredients:

3 Tbs butter
1/2 c applesauce
1/2 c Greek yogurt
3 eggs
2/3 c sugar
2/3 c brown sugar
1 1/2 tsp baking soda
1 1/2 c flour
1 c old fashioned oats
2 ripe bananas
1 cup blueberries
1 tsp vanilla
Splash of milk

Directions:

Preheat the oven to 350 ˚. Lightly grease muffin tin and set aside while you make the batter.  Mix all sugars and butter together until nice and creamy.  Add applesauce, yogurt, and eggs and mix thoroughly.  Add oats, baking soda, vanilla, milk and mashed bananas to the mixture.  Fold blueberries in right before you are ready to put the batter into the muffin tins.  Fill the tins about 3/4 full.  Bake for 10-15 minutes depending or until a toothpick comes out clean.  Makes approximately 2 dozen.

Forgot to grab a picture before they were already baking away!
I love the rich blue color!
I can't have mine without butter and jelly!!
I can’t have mine without butter and jelly!!


Posted on Leave a comment

No Soliciting Sign

I have been enjoying working in my yard so much this summer!  I have never been great at keeping plants alive but it is amazing what watering them daily can do…who would have thought?! My Grandma Bloesser helped me pot up these bad boys and I brought them back from Ulysses at the end of May.  I even made sure to have a neighbor water them while we were gone so they would be ok!  (Thanks Richelle!) Here are a few before and after pictures of them because I have to show them off!

Sweet Potato Vines from Grandma Bloesser right when we planted them.  There is a geranium in there too but now the vine is so big you can't even see it.  I am debating moving it to another pot.
Sweet Potato Vines from Grandma Bloesser right when we planted them. There is a geranium in there too but now the vine is so big you can’t even see it. I am debating moving it to another pot.
Look how beautiful they are!  I was so excited to see them draping out of the wagon!  Beautiful!
Look how beautiful they are! I was so excited to see them draping out of the wagon! Beautiful!
Tomato plant before...
Tomato plant before…
Tomato plant sitting tall and pretty!
No tomatoes quite yet but they are starting to bud!
This is a flower JoAnn planted a few years ago.  Alex keeps getting on me for giving it a little Miracle Grow every few days or so.  It has really grown since May.  I started watering it regularly along with the other plants and it measures 27"x21.5"!
This is a flower JoAnn planted a few years ago. Alex keeps getting on me for giving it a little Miracle Grow every few days or so. It has really grown since May. I started watering it regularly along with the other plants and it measures 27″x21.5″!

Most people would agree that solicitors are not exactly anyone’s favorite people to deal with on a day you are home and trying to relax.  I can remember when I was little and solicitors would come by the house. We would all hide and be super quiet so they wouldn’t know we were home! To help alleviate this, I have been brainstorming up a No Soliciting sign for awhile.  In fact, my original plan was to make a mini sign to put into my watering can that I made-over for Alex.  I even painted a small wooden sign that I grabbed at Michaels and painted it red.  I was going to use white and black vinyl to make it but I really wanted something bigger.  I mean…let’s face it….we need it to stand out so they will see it!

Click here to see my tutorial for the Nebraska watering can!
I was watering my plants the other day like a good little gardener...and I found this piece of wood and this wooden stake that were just laying in our back yard.  I decided right then and there that I must use this to make a sign!
I was watering my plants the other day like a good little gardener…and I found this piece of wood and this wooden stake that were just laying in our back yard. I decided right then and there that I must use this to make a sign!
So I took some nails and put the sign together!
I cut out the lettering using vinyl and my Cricut.  After placing the vinyl where I needed it, I painted it with some acrylic paint I scored from Wamart for 57¢!  This project cost me practically nothing as I used some scrap vinyl from another project!
I cut out the lettering using vinyl and my Cricut. After placing the vinyl where I needed it, I painted it with some acrylic paint I scored from Wamart for 57¢! This project cost me practically nothing as I used some scrap vinyl from another project!
The wood was pretty old and the vinyl did not want to stick very well, so I had to tape it down to keep it from lifting while I was stenciling.  Make sure to be careful not to push excess paint underneath the vinyl when doing this!
The wood was pretty old and the vinyl did not want to stick very well, so I had to tape it down to keep it from lifting while I was stenciling. Make sure to be careful not to push excess paint underneath the vinyl when doing this!
Here is the final product!  Ironically, while I was painting this, there was a solicitor that came by and stuck a flyer in our door.  Maybe that won't happen next time!
Here is the final product! Ironically, while I was painting this, there was a solicitor that came by and stuck a flyer in our door. Maybe that won’t happen next time!
Our House!
Our House!


Posted on Leave a comment

Jo’s Fireworks

So Alex and I spent the most amazing 10 days with friends and family over the Fourth of July! His mom has the sweetest little fireworks stand that she has done forever. This year she had to work so we took off work and went down to run the stand along with his cousin Jillana and his parents.

Jo's Fireworks
Jo’s Fireworks

Jo’s Fireworks is a local favorite located 2 miles outside of Alex’s hometown of Haigler, NE. It is actually located in the middle of a field. The field actually has cows in it and everything! Chloe and Mia had a blast roughin’ it as country dogs! The first thing Mia did was throw herself on the ground and had a good roll in the tilled dirt. She was in heaven! Chloe loves to get dirty too, but she was more interested in chasing the jack rabbits and playing her role as a fly trap! The horse flies in the area were biting up a storm and she got to the point where she would just chomp at them as they flew around her face. It was the cutest thing! For big city girls, they were loving the country.

Alex's goddaughter Karly loved spending time at Jo's Fireworks with the dogs!  We even got Mia to pose for a pic!
Alex’s goddaughter Karly loved spending time at Jo’s Fireworks with the dogs! We even got Mia to pose for a pic!
Mia and Chloe chillin' in the winnebago.
Mia and Chloe chillin’ in the winnebago.

Before making our way down to Nebraska, I made cut out vinyl lettering for a sign Alex’s mom had. The lettering had to be pretty big so that you could see the sign from the road, as the shack is pretty much in the middle of nowhere. I tried to spice it up by using a digital fireworks cartridge from Cricut.com. I used a firecracker as the apostrophe and the “i” in Fireworks. I was pretty happy with the result for my first big vinyl project!

The sign measured 57"x33". The hardest part for me was figuring out the exact measurements of what each letter was supposed to be. I ended up taping a 57"x33" rectangle on my floor to help give me a visual. I should have waited for Alex to help me with measurements but I was determined to figure it out on my own!
The sign measured 57″x33″. The hardest part for me was figuring out the exact measurements of what each letter was supposed to be. I ended up taping a 57″x33″ rectangle on my floor to help give me a visual. I should have waited for Alex to help me with measurements but I was determined to figure it out on my own!

We had so much fun running the fireworks stand and got to spend some qt with his family. It was so fun hearing all of the customers talk about how they had been coming to Jo’s since they were little and now they were bringing their kids out too. It was so fun to be part of their experience and I learned a lot about fireworks too! I am excited to do it again next year!

Click here to see Jo's Fireworks on Facebook!
Click here to see Jo’s Fireworks on Facebook!