Posted on Leave a comment

Daddy’s Day

Today at summer school, we started our Father’s Day projects and it was too much fun! I always feel bad for the dads of my class seem to get the shaft on Father’s Day because the holiday is in June. Most schools are out before then and so the kids don’t get a chance to make them a gift at school. Not my summer school class! I am teaching 1st grade math this summer and am actually really enjoying it! I usually teach 2nd grade but I wanted to spice it up a bit for the summer and try something different. I have an amazing partner in crime! Her name is Mrs. Black and she is teaching first grade at our school next year. She’s amazing and a true Pinterest Queen like me! I remember our second day in summer school and she came in and had little buses and cars cut out with the bus routes and kids on them! That’s my style! I am excited to get the chance to teach with her this summer!

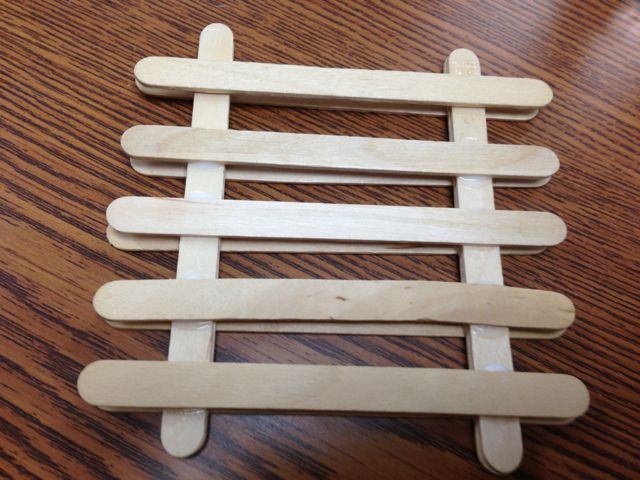
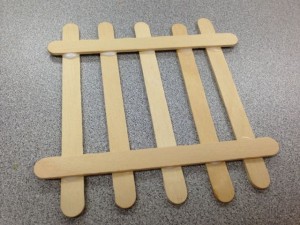
For Father’s Day we have both been pinning like crazy and I found the BEST Pinterest idea of making little coasters out of Popsicle sticks and glue that look like little wood pallets. Luckily Mrs. Black had a few boxes of small Popsicle sticks and I had leftover glue from last year! I am sure my fellow teachers would agree…finding a project like this that is cheap is amazing and supplies on hand…even better!

Wood Pallet Coasters for Father's Day!
Wood Pallet Coasters for Father’s Day!

A few pins I found looked more realistic as they cut the ends of the sticks straight but let’s face it…we don’t have time for that! They still turned out adorable. I am still brainstorming a little saying to add to it but hasn’t came to me yet! If we had more time, I would have loved to make a set of 4 per child, but we have little time at the end of the day. I have been pulling them in tables and got through 2 in the amount of time we had to fit it in. Two down….three more to go!
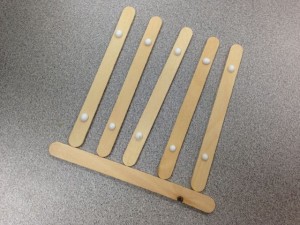
INSTRUCTIONS:

Line up five Popsicle sticks. I used an extra stick at the bottom to make sure they were lined up good.
Line up five Popsicle sticks. I used an extra stick at the bottom to make sure they were lined up good.  Put a glue dot about a thumbs length from both edges on you Popsicle stick. Repeat on all 5.
Place a Popsicle stick horizontally on top of the glue dots on both sides.
IMG_0031_2
Repeat then glue dots on top of each of the top Popsicle sticks to avoid too much glue. (Trust me I had 1st graders with oozing pallets that I had to redirect a few times!) place a Popsicle stick on top of each one to prop the pallet up a bit.
Do the glue dots in the same place as before and add the 5 Popsicle sticks across to finish off your pallet coasters and set away to dry. I would suggest an adult the pick it up after it has been sitting a bit to make sure to hold it in place.
Super cute!
Super cute!

These turned out so cute and I was very pleased with the project. The kids had fun making them too!  I hope you enjoyed!  Please feel free to leave a comment and tell me what you think!

Posted on Leave a comment

JIF Can Makeover

My favorite everyday snack!

Alex teases me all the time about the large amounts of peanut butter that I eat.  I can’t help it!  I eat an apple with peanut butter almost everyday!  It is a great healthy snack and I never really seem to get tired of it.  I am not sure what it is about peanut butter with apples, but it makes me feel like I am eating something naughty but it is actually a healthy snack!  When I was heavily drinking Shakeology every morning, Alex bought a huge can of peanut butter and it was amazing how quickly we went through it!  (Little does he know I have a stash of peanut butter at school so I actually eat more than he can imagine! lol)

I have like 4 of these cans that are in need of a Pinterest-worthy craft project and today I decided to get with it.

We recently moved the dog food out to the garage…which I am not a huge fan of because in the morning it seems like I am always in a hurry and it is a pain to have to go out to the garage and upstairs to feed the pups.  Awhile back, I had decided to do a treat canister with one of my JIF containers.  So when I finally sat down to do it, I decided a food canister was also necessary!  I am pretty pleased with the results and it took me like 20 minutes.

Cut your 12x12" paper at 5 13/16"  I used 2 pieces for both cans, cutting an extra 4 1/2" x 5 13/16" for the back part.
Cut your 12×12″ paper at 5 13/16″ I used 2 pieces for both cans, cutting an extra 4 1/2″ x 5 13/16″ for the back part.
Get out your handy dandy Mod Podge!
Get out your handy dandy Mod Podge and a paint brush.
I am not sure why I do not use this stuff more often!  I am always pleased with the results!
Paint some of the Mod Podge on the cannister.
Line up the scrapbook paper of your choice.  I lined mine up with the bottom so that it didn't interfere with the lid.
Line up the scrapbook paper of your choice. I lined mine up with the bottom so that it didn’t interfere with the lid.
Add whatever you want the canister to say and voila!
Counter space by the fridge.
Counter space by the fridge before…
Alex is always complaining that he has to share his smoothie station with the dogs...lol
Alex is always complaining that he has to share his smoothie station with the dogs…lol
Counter space after!  AND this mama doesn't have to run to the garage every time her babies need some grub!
Counter space after! AND this mama doesn’t have to run to the garage every time her babies need some grub!
Alex's smoothie station...all to himself!  I am sure he will be a happy camper!
Alex’s smoothie station…all to himself! I am sure he will be a happy camper!

Overall this was a super fun and quick craft to do with a recycled container!  Oh how I love projects that are complete upcycles!  They turned out super cute and my mind is already swirling with ideas to do with the next two canisters sitting in my closet!  This would be a fun project to do with the kids!  Who says my peanut butter addiction can’t have its perks?!


Posted on Leave a comment

Banana Bread

I have been experimenting with some banana bread recipes.  My goal has been to try to make one that I can make from things that I have around the house and to not need to run to the store for anything.  (Ok so I did have Alex pick up some walnuts but by the time I got around to making it, they had been in the cupboard for a few days!)  We eat a lot of bananas in this house.  We usually pick up two bunches at a time.  One ready to go and another that is nice and green and will be ready by the time we get through the others.  I have never been a huge banana fan.  They are ok, but they are definitely growing on me!  I like them when they are perfect but once they start to brown they gross me out!  Too slimy for my taste!  That’s why I have been on the hunt for the perfect banana bread recipe!

I made some banana muffins last week that my Instructional Coach told me about.  I was getting ready to go out of town, so I did not get a picture or anything but they were pretty good for a healthy alternative!  You can find this recipe at 100 Days of Real Food.  I am always looking for something even more delicious, so I decided to hunt on for some new recipes.  The one I based this one off of can be found at Fit Sugar.  This one is a bit different than what I came up with but that is just how I do it!  Come to think about it, the banana muffins recipe I added applesauce for a kick and this one already called for it.  I decided to substitute an extra banana for the diced apple, though I may have to try that sometime.  I just needed to use up all of the bananas.  The recipe also called for sugar and I decided to use honey and brown sugar instead to give it more of a rich taste.  I was going to just use honey but I decided the brown sugar would kick it up a notch.

Ingredients:

3 ripe bananas

1/2 cup apple sauce

1/3 cup honey

1/3 cup brown sugar (a little extra for topping if desired)

1 teaspoon baking soda

1 teaspoon salt

1 3/4 cup flour

1 cup crushed walnuts

The gangs all here!
The gangs all here!

Instructions:

Preheat the oven to 350°.  Mash bananas in a bowl with a fork.
Preheat the oven to 350°. Mash bananas in a bowl with a fork.
photo (1)
Add the rest of the ingredients and mix together well.
photo (2)
Add to a greased loaf pan. Add a cup of crushed walnuts mixed with some brown sugar. Bake for 50-70 minutes or until a toothpick inserted in the middle comes out dry.
Delicious!
Delicious!

This turned out even better than I would have guessed!  I was very happy with the flavor.  If I were to do it differently, I would add half of the walnut/brown sugar mix to the batter and just top it off with the other half.  It came out almost overflowing with walnuts and they were not sticking to all of it.  Other than that I would actually use this one again!  It was delicious.  I would like to try some chocolate chips in my next one but that is the fat girl in me!  I will at least make it dark chocolate since I LOVE LOVE LOVE that anyways and it is a bit better for you.


Posted on 2 Comments

Grilled Swai & Fried Quinoa

So I have been eying quinoa recipes for awhile. I made some meatballs a a few weeks ago with quinoa in place of rice or oatmeal. They were pretty delicious. In fact, now that I think about it…I think I made those one of the last few weeks of school and I haven’t blogged about it yet… I cannot express how much fun I am having getting my blog on! I was missing it! I do start summer school tomorrow. I will be working four days a week and will be off by 12:30…so it’s not a terrible gig. As much as I would have loved to take the summer off, I am working on getting my lovely credit card paid off. I will be teaching first grade math, so that will be a little bit of a change for me!

Anyways back to what was for dinner tonight! I asked Alex this morning what he was wanting for supper. He didn’t really have much to say, but I needed to be the chef tonight, as he had made me breakfast the past 2 mornings in a row…Thanks baby!! As I shifted through our freezer, I decided we had not made fish in awhile. Last summer, we started buying Swai. It is very much like Tilapia, in fact I do not see much of a difference.

Ingredients:
Swai
cajun seasoning
soy sauce
2 minced garlic cloves
salt & pepper
olive oil
aluminum foil

Instructions:

Make sure to let the seasonings sit at least 30 minutes prior to cooking.

Place the thawed fish in a pan season both sides with the Cajun seasoning, salt, and pepper. Let marinate for 30 minutes. If using a Traeger Grill, turn the Traeger on to smoke with the lid open for 5 minutes. Take some aluminum foil and fold the sides up creating a makeshift pan. This will help the oil and soy sauce not drip off. Place this aluminum foil pan on the grill and turn the heat up to 325. Drizzle pan with soy sauce and olive oil. Place fish on pan. Drizzle the fish with soy sauce and olive oil as well. Close the lid and let cook 15 minutes before turning it over once. Cook another 10-15 minutes or until fish is flakey.

DSCN1867
Sooooo yummy!

Fried Quinoa

Ingredients:
1 cup quinoa
1 cup chopped carrots
1 medium white onion, diced
4 tablespoons soy sauce
1tablespoon butter
2 eggs
1/2 cup chopped cilantro
1/2 cup chopped green onions
2 tablespoons olive oil
salt & pepper

Instructions:
Start a pot of quinoa with 2 cups of water. Bring to a boil, then simmer for 15-20 minutes or until the quinoa is clear in the middle. While this is working, start cooking the onions and carrots with a little salt and pepper and 1 tablespoon of olive oil. When the veggies are cooked, add 2 eggs and scramble. Set the veggie and egg mixture to the side in a separate bowl. When the quinoa is cooked, use a handheld strainer (most noodle strainers are too small. You need one that has a small net-like screen). Add 1 tablespoon olive oil and 1 tablespoon butter to the pan on medium. After it is melted, add the quinoa to the pan and cook for 4 minutes. Add the carrot and egg mixture to the quinoa and cook over medium for 2-3 more minutes. Add cilantro and green onions right before serving.

Full of protein!
Full of protein!

Results:
This was a great meal! Alex liked it too! The fish was absolutely delicious and the fried quinoa was a great alternative to one of my all time favorites…fried rice. I would like to try a few more recipes to see if there is a better one out there on Pinterest that I need to be aware of! Overall I was pretty satisfied with the turnout! I am pretty excited for my leftovers for lunch tomorrow!