Posted on 2 Comments

Grilled Swai & Fried Quinoa

So I have been eying quinoa recipes for awhile. I made some meatballs a a few weeks ago with quinoa in place of rice or oatmeal. They were pretty delicious. In fact, now that I think about it…I think I made those one of the last few weeks of school and I haven’t blogged about it yet… I cannot express how much fun I am having getting my blog on! I was missing it! I do start summer school tomorrow. I will be working four days a week and will be off by 12:30…so it’s not a terrible gig. As much as I would have loved to take the summer off, I am working on getting my lovely credit card paid off. I will be teaching first grade math, so that will be a little bit of a change for me!

Anyways back to what was for dinner tonight! I asked Alex this morning what he was wanting for supper. He didn’t really have much to say, but I needed to be the chef tonight, as he had made me breakfast the past 2 mornings in a row…Thanks baby!! As I shifted through our freezer, I decided we had not made fish in awhile. Last summer, we started buying Swai. It is very much like Tilapia, in fact I do not see much of a difference.

Ingredients:
Swai
cajun seasoning
soy sauce
2 minced garlic cloves
salt & pepper
olive oil
aluminum foil

Instructions:

Make sure to let the seasonings sit at least 30 minutes prior to cooking.

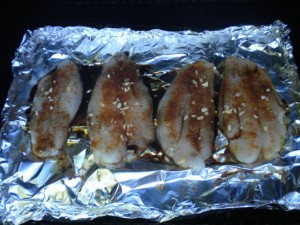
Place the thawed fish in a pan season both sides with the Cajun seasoning, salt, and pepper. Let marinate for 30 minutes. If using a Traeger Grill, turn the Traeger on to smoke with the lid open for 5 minutes. Take some aluminum foil and fold the sides up creating a makeshift pan. This will help the oil and soy sauce not drip off. Place this aluminum foil pan on the grill and turn the heat up to 325. Drizzle pan with soy sauce and olive oil. Place fish on pan. Drizzle the fish with soy sauce and olive oil as well. Close the lid and let cook 15 minutes before turning it over once. Cook another 10-15 minutes or until fish is flakey.

DSCN1867
Sooooo yummy!

Fried Quinoa

Ingredients:
1 cup quinoa
1 cup chopped carrots
1 medium white onion, diced
4 tablespoons soy sauce
1tablespoon butter
2 eggs
1/2 cup chopped cilantro
1/2 cup chopped green onions
2 tablespoons olive oil
salt & pepper

Instructions:
Start a pot of quinoa with 2 cups of water. Bring to a boil, then simmer for 15-20 minutes or until the quinoa is clear in the middle. While this is working, start cooking the onions and carrots with a little salt and pepper and 1 tablespoon of olive oil. When the veggies are cooked, add 2 eggs and scramble. Set the veggie and egg mixture to the side in a separate bowl. When the quinoa is cooked, use a handheld strainer (most noodle strainers are too small. You need one that has a small net-like screen). Add 1 tablespoon olive oil and 1 tablespoon butter to the pan on medium. After it is melted, add the quinoa to the pan and cook for 4 minutes. Add the carrot and egg mixture to the quinoa and cook over medium for 2-3 more minutes. Add cilantro and green onions right before serving.

Full of protein!
Full of protein!

Results:
This was a great meal! Alex liked it too! The fish was absolutely delicious and the fried quinoa was a great alternative to one of my all time favorites…fried rice. I would like to try a few more recipes to see if there is a better one out there on Pinterest that I need to be aware of! Overall I was pretty satisfied with the turnout! I am pretty excited for my leftovers for lunch tomorrow!

Posted on 1 Comment

Post It Note Holder

These Post-It Note Holders are such a great gift and so easy!
These Post-it note holders are such a great gift and so easy!

I have been eyeing a few pins on Pinterest for Post-it note holders for awhile now. I made my first one in April for my friend JaQue’s birthday. I also did a load of these before this blog post that were for Mother’s Day. I sent a bunch of them out and with the school year coming to an end, I did not even get a picture! So I decided that instead of plain “thank you” notes for some of my amazing coworkers, I would make them some of these as well! It was super easy and I was really impressed with the result product!

What you will need…

cardstock paper

scoring board

scissors

mini pens (These can be tricky to find. I found mine at Walmart in the party favors section They were $1.97 for 8 pens!)

Post-it notes

glue runner

large permanent glue dots

First, start with a piece of cardstock cut at 3 1/4" x 7 3/8".  You will need to score it at 3 1/8", 3 1/2", and 3 7/8".
First, start with a piece of cardstock cut at 3 1/4″ x 7 3/8″. You will need to score it at 3 1/8″, 3 1/2″, and 3 7/8″.
Fold the scored lines with the middle one facing out.
Cut two slits stopping at the second score mark. This is where your pen holder comes in.
Bend down the scoring line toward the longer end. This is where you will put some tape to hold the pen holder in place.
Make sure only the longer side is the one that is connected to the base of the holder.
Place the Post-it pad on the bottom part of the holder with permanent glue dots to hold the pad down securely. The last part is so easy! Add a piece of cardstock cut at 2 3/4″ x 3″ and add a name on if you like! Add your pen and voila!

These were so much fun to make! I just wrote a message on the inside and it doubles as a gift AND a card! Double score! You must try these! They are too fun and way too easy to pass up!

Click here to follow me on Pinterest!

Posted using Tinydesk blog app

Posted on 1 Comment

Watering Can Makeover

Love it!
One of a kind flowerpot!

I had the most amazing weekend with my family!! I was definitely ready to relax after school got out. Originally, my mom was thinking about coming up my way. She has been on the hunt for something to wear for my sister’s wedding coming up here in August. I had talked to my cousin Cally and she was planning on heading home for Memorial Weekend. I have not seen my cousin for five years, which is crazy because we used to be joint at the hip! It is crazy how life gets as we all grow older,it seems like we just can’t find the time to get together anymore. I need to be better about that! It’s funny though because even though we have not been together for so long it was like yesterday! Her brother Trevor was home too, along with her husband Stevo. We had a great night out catching up!

IMG_1840
Stevo, Cally, myself, and Trevor at the Iron Horse
Cousinly love!
Cousinly love!

While I was home, I also got some quality time in with the rest of my family. I wish I were closer to them. My mom and Troy had planned on getting the pool up while I was home but that good old Kansas wind had another idea! We had a BBQ Saturday which turned out amazing! The weather was perfect by the time we started. I spent some time with my dad looking through old family photos.

My dad and me!
My dad and me!

Monday was a busy day for me, as I also got to have dinner with my Grandma and Grandpa Underhill. It was a special evening as they have been married for 35 years! It was so cute listening to them tell about how my grandpa asked her out and when they started dating. I cannot tell you how special their relationship is and how much I look up to their love!

Grandpa and Grandma Underhill and their pup Bentley.
Thanksgiving 2011
Thanksgiving 2011

On Monday my Grandma Bloesser and I spent the day planting flowers and moving around her “craft studio”. I had been wanting to plant a garden a few weeks ago but once we got down to it, I couldn’t believe how much $ goes into starting a garden. Unfortunately I have a card that I am trying to get paid off this summer so I decided not to do it.

My mom gave me this adorable flowerpot for my classroom. Due to allergies I had to bring it home. You can imagine the joy on Alex's face when I put it on our back porch!
My mom gave me this adorable flowerpot for my classroom. Due to allergies I had to bring it home. You can imagine the joy on Alex’s face when I put it on our back porch!

I decided I wanted to makeover the flowerpot to something that was more geared towards both of us! I have not played with vinyl on my Cricut yet and decided it might be cool make it into a Nebraska Huskers watering can. Alex did not like the idea of me spray painting anywhere at the house. I was not planning on making a mess but I do know what a mess spray painting can be.

My grandma is always full of good ideas! She set me up with a cardboard box and put a long piece in between the flap. This worked amazing! You just spray into the box and it didn't make a mess!
My grandma is always full of good ideas! She set me up with a cardboard box and put a long piece in between the flap. This worked amazing! You just spray into the box and it didn’t make a mess!
I cut a N out of vinyl with my Cricut. It cut fine but I had some trouble with transferring it. I used Glad Press and Seal because I read that was a good alternative to transfer tape. It did not work like I had hoped so I ended up just peeling the backing off and eyeballing it.
The watering can turned out perfect! Alex loved it!
My Grandma Bloesser also sent me home with an antique wagon with a sweet potato vine that looks so cute in our rock garden.
Grandma also decided even though I skipped the garden that I needed to at least have a few tomato plants!


Posted on Leave a comment

Grandma Bloesser’s Freshly Squeezed Limeade

Today we had a BBQ at my Grandma Bloesser’s house since I was home for Memorial Weekend. Grandma taught me how to whip up some fresh squeezed limeade! It was so hot out and we were in need for something refreshing to drink! Mom and I picked up about 10 limes from the store. I think we only used about 6 of them but it is always good to have more than less.

Grandma’s Freshly Squeezed Limeade

Ingredients
10 limes
1/4 cup light corn syrup
Water
Sugar to taste
Before using a squeezer, take the limes and roll them between your hands until they are soft. This will help get the juices flowing and make them easier to squeeze. After each lime is soft, cut them in half and use a squeezer to get all the juice you can get out of each lime. Toss the squeezed limes in the pitcher.
bth_photo
bth_photo_1
Me being silly while squeezing away!
Don't fill the pitcher up all the way until you play with the sugar first!
Don’t fill the pitcher up all the way until you play with the sugar first!
We had quite a bit of juice from 6 limes so we sat the other ones aside. We added cold water and some sugar to the pitcher and mixed it up good. (This is where you would add the corn syrup but we were out so we just used sugar.) Start with less sugar because you can always add more. Luckily if we would have used too much sugar we had 4 more limes on standby. There is not a specific amount of sugar to add so just add to taste, pour over ice and enjoy!!
My beautiful grandma!
I love learning how to make things I held so dear to my heart while growing up! I had some of my best times helping grandma out in the kitchen! I will always remember when I was having a tough time grandma would always say…”When life hands you lemons…Make lemonade!” Or in this case…limeade!!