Fridays can tend to be a pretty crazy day for me at work. We usually have a language arts assessment of some sort, and this Friday we also had a math test! I try to make sure to squeeze and art project in on days like that to give my kiddos something fun to look forward to. I love art days! My school does not have an art program at the elementary level, which I feel is very important. Last year, my class did a musical called The Color Factory. It was the cutest program where they sang songs about colors and had little skits in between. I was surprised when my music teacher told me that some of the kids did not know how to mix colors! I couldn’t believe it! Once I thought about it, it made perfect sense because they do not get the opportunity to have classes with an art teacher. I made sure to squeeze a lesson on ROYGBIV to help them learn the colors of the rainbow. I am looking forward to doing that lesson again with my class this year!
This is the first art project we did at the beginning of the year. I found it on Pinterest. It seemed fitting since our school theme this year is Reach for the Stars. It was super easy and the kids loved it. We just traced our arm and hand and they colored them however they wanted
This week we got a chance to do coffee filter art! I love this project because they were able to use their imaginations to make their coffee filter into whatever their little hearts desired. We had planned on doing this project last week and I usually try to have an example made before we start so they can get a visual of what their final product will look like. Unfortunately, last week our test took longer than I had anticipated, so we had to push it until the next week.
My coffee filter art example.
This week they kept asking me when we were going to get a chance to do our art project. One of my sweet girls came up to me while we were waiting for buses one day this week and handed me a book from my classroom library titled What is Round? by Rebecca Kai Dotlich with photographs from Maria Ferrari. She thought we needed to read it to inspire our artwork! I made sure read this book before we got started. It started a great discussion before we got started.
This is the book that we read before we started our art project! It was a great way to get them started brainstorming on what they were going to make out of their coffee filter!
Materials:
coffee filters
markers
squirt bottle with water
glue
construction paper
Instructions:
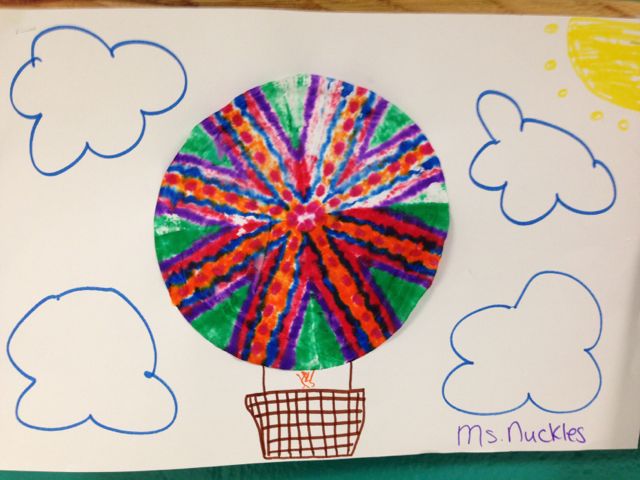
Fold filter in half.Fold the filter into fourths.
Then fold into eighths and spray with water bottle generously on both sides.Start making a design on the filter with markers. Since the filter is wet, watch the color spread throughout!
Make sure to do the EXACT same pattern on the back. This will ensure that the marker bleeds through the entire filter.Open it up and viola! Instant artwork! Then comes the fun part! You get to decide what to make it into!Here is my class example that I did with the class on Friday. This one is much more colorful and turned into a beautiful hot air balloon!
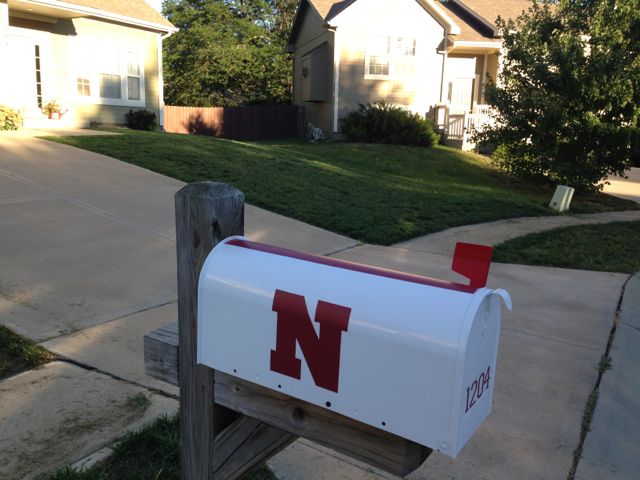
Well it is that time again! Football season is finally upon us and just in time for a mailbox makeover! A few weeks ago, I went out to check the mail and let’s just say our mailbox has seen better days! We used to have a black plastic mailbox that rarely would shut and this time one of the hinges broke off.
It occurred to Alex and I that maybe it was time to bite the bullet and buy a new mailbox. This gave me the perfect opportunity to do something crafty with it! Alex loves his Huskers, so I wanted to find a mailbox that I could spray paint red and use white vinyl for the N. Alex decided a white mailbox with red vinyl would match their helmets, so that is what I did. I did not like the color of red that I could find, so I decided to use acrylic pain and use the vinyl as a stencil. This ended up being what I like to call a DIY “fail” as I let the paint dry before ripping off the stencil. Let’s just say I made a huge mess of it and ended the afternoon scrubbing the paint off in the sink. It came off pretty well and I decided after that hassle, the darker red vinyl would just have to work!
Ordinary white mailbox from Home Depot.Side viewI cut out two N’s and a strip for the top of the mailbox.
Things have been COMPLETELY nuts around here! I went back to work on August 1st. I have been so busy doing projects for my classroom and the year is just beginning. Plus my sister got married the weekend before school started so I have been super busy! I have a post coming soon with some pictures as well as a project that I worked on for her wedding, so be on the lookout!
This is my beautiful sister Heather and I on her wedding day! Congrats Heather and Paul! It was such a happy day!
We just finished our 3rd week of school! It is almost time for midterms! I cannot believe it! I started the year out with 28 kids and now have 27. This is WAY more than I am used to but I have a pretty good group! It is funny, every year gets easier but I find myself coming home completely exhausted. I think this year is going to be so much fun. I am introducing some new structure to my classroom to hold the kids more accountable.
Since things have been super crazy, I decided to highlight the top 5 makeover projects I worked on for my classroom this year. My room is a jungle theme and I thought I had everything decorated the way I wanted until Alex got me my Cricut for Christmas last year. I found myself redoing a lot of things that I had purchased from the store because I could make it more unique and EXACTLY the way I wanted it.
Here is a picture of my Cricut and the first card that I made with it! The possibilities are endless with this machine.
For those of you who are not aware of what a Cricut is, it is a die cut machine. The machine can cut paper, fabric, vinyl, etc. You buy cartridges for it and that is the shapes you can cut out. I use Cricut Craft Room on my computer to create my masterpieces. If you have a Cricut and only have played around with the machine itself, do yourself a favor and download the Craft Room design software. It allows you to use a virtual mat to create layers and use exact measurements. I will say that sometimes it is a bit finicky, but you can do so much more with it!
Makeover Project #1: Job Chart
My old job chart was called Happy Helpers that I purchased from the teacher store. There are 7 monkeys in the tree that have job titles on them. I was terrible about remembering to switch them out at the end of the week and the kids would always have to remind me. Each kid had a banana with their name on it that I clipped to the job for the week. The next week, I would put those bananas back in the basket and replace it with new ones. I did not really have much of a system to make sure each kid gets a chance to be line leader, door holder, etc. It just depended on who I pulled out of the basket.
My Old Job Chart
My old job chart…
My New & Improved Job Chart
This is my new job chart. It is set up so that the clips move down and around the chart each week so that they have a new job almost every week.
This job chart is a big part of my classroom structure. Each student has a clip with their name on it. They move down or over each week so that each student gets a chance to change jobs each week. Due to the high number of students I have this year, there are 2 jobs that more than one student will be one for a few weeks in a row. These are Clean-Up Crew and Vacation Crew. Otherwise, there is a boy and a girl on each job. I have found that not all kids can handle each job, so if I use teacher discretion to switch them around if needed. This year, our school has adapted an economics incentive plan using Cubs Bucks, which works out for this because as long as they do a good job on their duty, they get paid for their job each day. If I notice they are struggling to do their classroom job, they do not get paid. We are trying to teach the kids how to save their money up for certain privileges like eating with the principal or free time in the gym.
If you would like to download a free copy of my job chart, click the following link Classroom Jobs Owls. Please feel free to leave comments if you have additional questions about how this chart works!
Makeover Project #2: Classroom Library
This year, I finally coded and organized my classroom library! With the help of my fellow teammate, Mrs. Heather, we broke down the different genres that we have in our classroom down to 8 categories. This is something that we have been wanting to do, but just had not got around to it. In fact, we both took advantage of getting into our classrooms before we were required to, to make sure this got finished and ready so we would have time to do other things to get our rooms ready. I am so happy with the way they turned out.
My Old Classroom Library
I did have some organization as my tubs are labeled with the different genres, however this did not work very well. The kids would just toss books back into whatever bins they wanted because they did not know where they were supposed to go.
My New & Improved Classroom Library
Notice the tubs have labels with genres on them. Each genre is a different colored label which matches the colored dot in the corner of the book so the kids know what tub each book goes in!Here are the dot stickers that I used for my books from amazon.com. I purchased 7 of them and only opened a couple but I will have plenty for new books that I add over the years!This was before I labeled the bins, but notice the lime green dot in the righthand corner of the book? That tells the kids that it is a chapter book.I used ModPodge to stick the labels I created with my Cricut to each bin.After sticking the label to the bin, I always do a healthy coat of ModPodge to seal it in.I found the best tubs for my chapter books at the Dollar Tree!Here is a good picture of my library corner. I moved some stuff around and added a tree because I thought that was super necessary! I love having a fun place in my classroom for my kiddos to go relax and read! In the jungle nonetheless!
This system is working out wonderfully in my room! My classroom librarians are the kiddos responsible for making sure all returned books are in the right bins and keeping the library looking nice! I even made a bookmark to that I used to introduce the different categories in the library. The kids had a blast coloring the different genres and learning about our library.
Here is a free pdf of my Library Codes Color and Bookmarks. After we colored the bookmarks, I had them laminated and put ribbon at the top so they would last a long time!
Makeover Project #3: Operation More Color
Last year was the first year I really had my classroom the way I wanted…so I thought. I absolutely love the animal print that is all around my room. In fact, I had the cutest bulletin boarders that look like real animal fur. The problem was, the only thing that went with them as far as a background went was black. I need color in my life! So this year, I decided I wanted more colorful bulletin boards. I found the most amazing bulletin borders at U.S. Toy during their Teacher Appreciation Sale and they were just what I was looking for!
My Old Bulletin Boards
Here are my bulletin boards last year. I purchase letters from the teacher store as well that matched my boarders. It was cute, but I wanted something more fun!
My New & Improved Bulletin Boards
Notice the cute pennants that I cut out using my Cricut? That thing pays for itself when I don’t have to purchase punch out letters to go with it!Panoramic view…
In addition to the bulletin boards, I finally got some chairs recovered for my classroom. To see a tutorial on how to recover an old office chair click here.
I recovered a chair for my reading table to match my crates!So fun and cute!My neighbor had this chair sitting outside, so I text her and asked her if she was throwing it out. I wanted to cover it for my classroom if she was. She told me it was mine!I love how this chair turned out. I think it cleaned up well! It doesn’t even look like the same chair! Looks great with the matching curtains that my Grandma Bloesser whipped up for me my first year.
Makeover Project #4: Birthday Wall
Can you remember when you were in school, the teacher always had a board or poster with your birthday on it. The last few years I have used a cupcake set that I purchased at the teacher store.
My Old Birthday Wall
Each kiddo had their own candle that went on the birthday month cupcake.
My New & Improved Birthday Wall
This birthday wall is so much more fun! Notice I used some of the monkeys that I already had and used my Cricut to cut out the party hats and balloons for each month. I wrote all the class birthdays on their birthday month balloon. Does that palm tree look familiar? That used to be my job chart tree. I love repurposing!! This is one of the favorite makeovers by far!
Makeover #5: Word Wall
I wanted to have more bulletin boards this year, so I decided to move my language arts bulletin to a wall so I could free up a new spot for other bulletins.
My Old Word Wall
Notice the pocket chart on the bulletin in the back of the room? That is where I put vocabulary and spelling words for the week.Wild About Words is my new area to put vocabulary and spelling words. This freed up another space for more bulletin boards in my room!
I hope you enjoyed checking out my new & improved classroom! I am absolutely in love with the way everything turned out. I have had so many compliments on how exciting of a learning environment that I have created! It is such an inviting space and the kids absolutely love it!
Many of you may recognize this guy as the reddit alien. For anyone out there who hasn’t checked out this social media website, I highly recommend it. While I spend my free time pining away, my boyfriend is usually catching up on reddit every chance he gets. Alex is on reddit from the time he gets up until the time he goes to bed! In fact, if we are out and he has forgotten his phone or it is dead, he thinks that automatically frees up my iPhone for his addiction! (but I don’t mind babe!) Alex has been a redditor since around the time the site has been created. I cannot tell you all the amazing content that you can find on this website. The reddit community in general is so amazing. Redditors do the most wonderful things all around the world. There is something for EVERYONE on reddit.
Alex is always talking about all of the good things reddit does around the world. For instance, I am participating in redditgifts for the Teachers 2013 , which is an amazing way teachers can get supplies for their classrooms. Last year’s program rallied up almost $150, 000 worth supplies for the new school year! Alex, being the amazing boyfriend that he is, emailed me the link to check out in case I needed some things for my classroom. I thought this would be the perfect opportunity to get some good read alouds for my classroom. Many people do not realize that teachers actually provide their own books for classroom libraries. We spend a lot of our own money on our classrooms and unfortunately we do not make a great deal of money for all we do. I was telling someone the other day that I had to buy something for my classroom and his response was, “well you can claim it on your taxes.” I quickly informed him that we are only allowed to claim $250 of our personal funds that goes towards classroom purchases. I spend a lot of time sifting through books at thrift shops to get new books for my classroom. If there are any Dr. Seuss books on the shelf I always make sure to snag them up!
This is what my classroom library looked like last year. Notice there is some organization here. I did have the books in labeled tubs. The problem was that the kids would not put them back in the right tub.Here is my classroom library this year! I moved some stuff around and added a tree because I thought that was super necessary! I love having a fun place in my classroom for my kiddos to go relax and read! In the jungle nonetheless!Notice the tubs have labels with genres on them. Each genre is a different colored label which matches the colored dot in the corner of the book so the kids know what tub each book goes in! I have a big post coming up with specifics about my library code system, so be on the lookout soon for Classroom Library Makeover-Nuckles Edition! 🙂
The reason I am writing this post is to describe my classroom and the supplies that I need for my care package. I signed up to try to get some good read aloud books for me to use in my classroom. For my non-teacher friends, a read aloud is a book that we read aloud in class. I love good read aloud books that have a good message for my students. There is this fabulous author named Julia Cook that writes these amazing life skills books for kids. Julia’s books teach such real lessons and I would love to have more of her books in my classroom.
I read this book to my class Tuesday and they begged me to read it again on Wednesday! Since it had a good message, I did manage to squeeze it in!
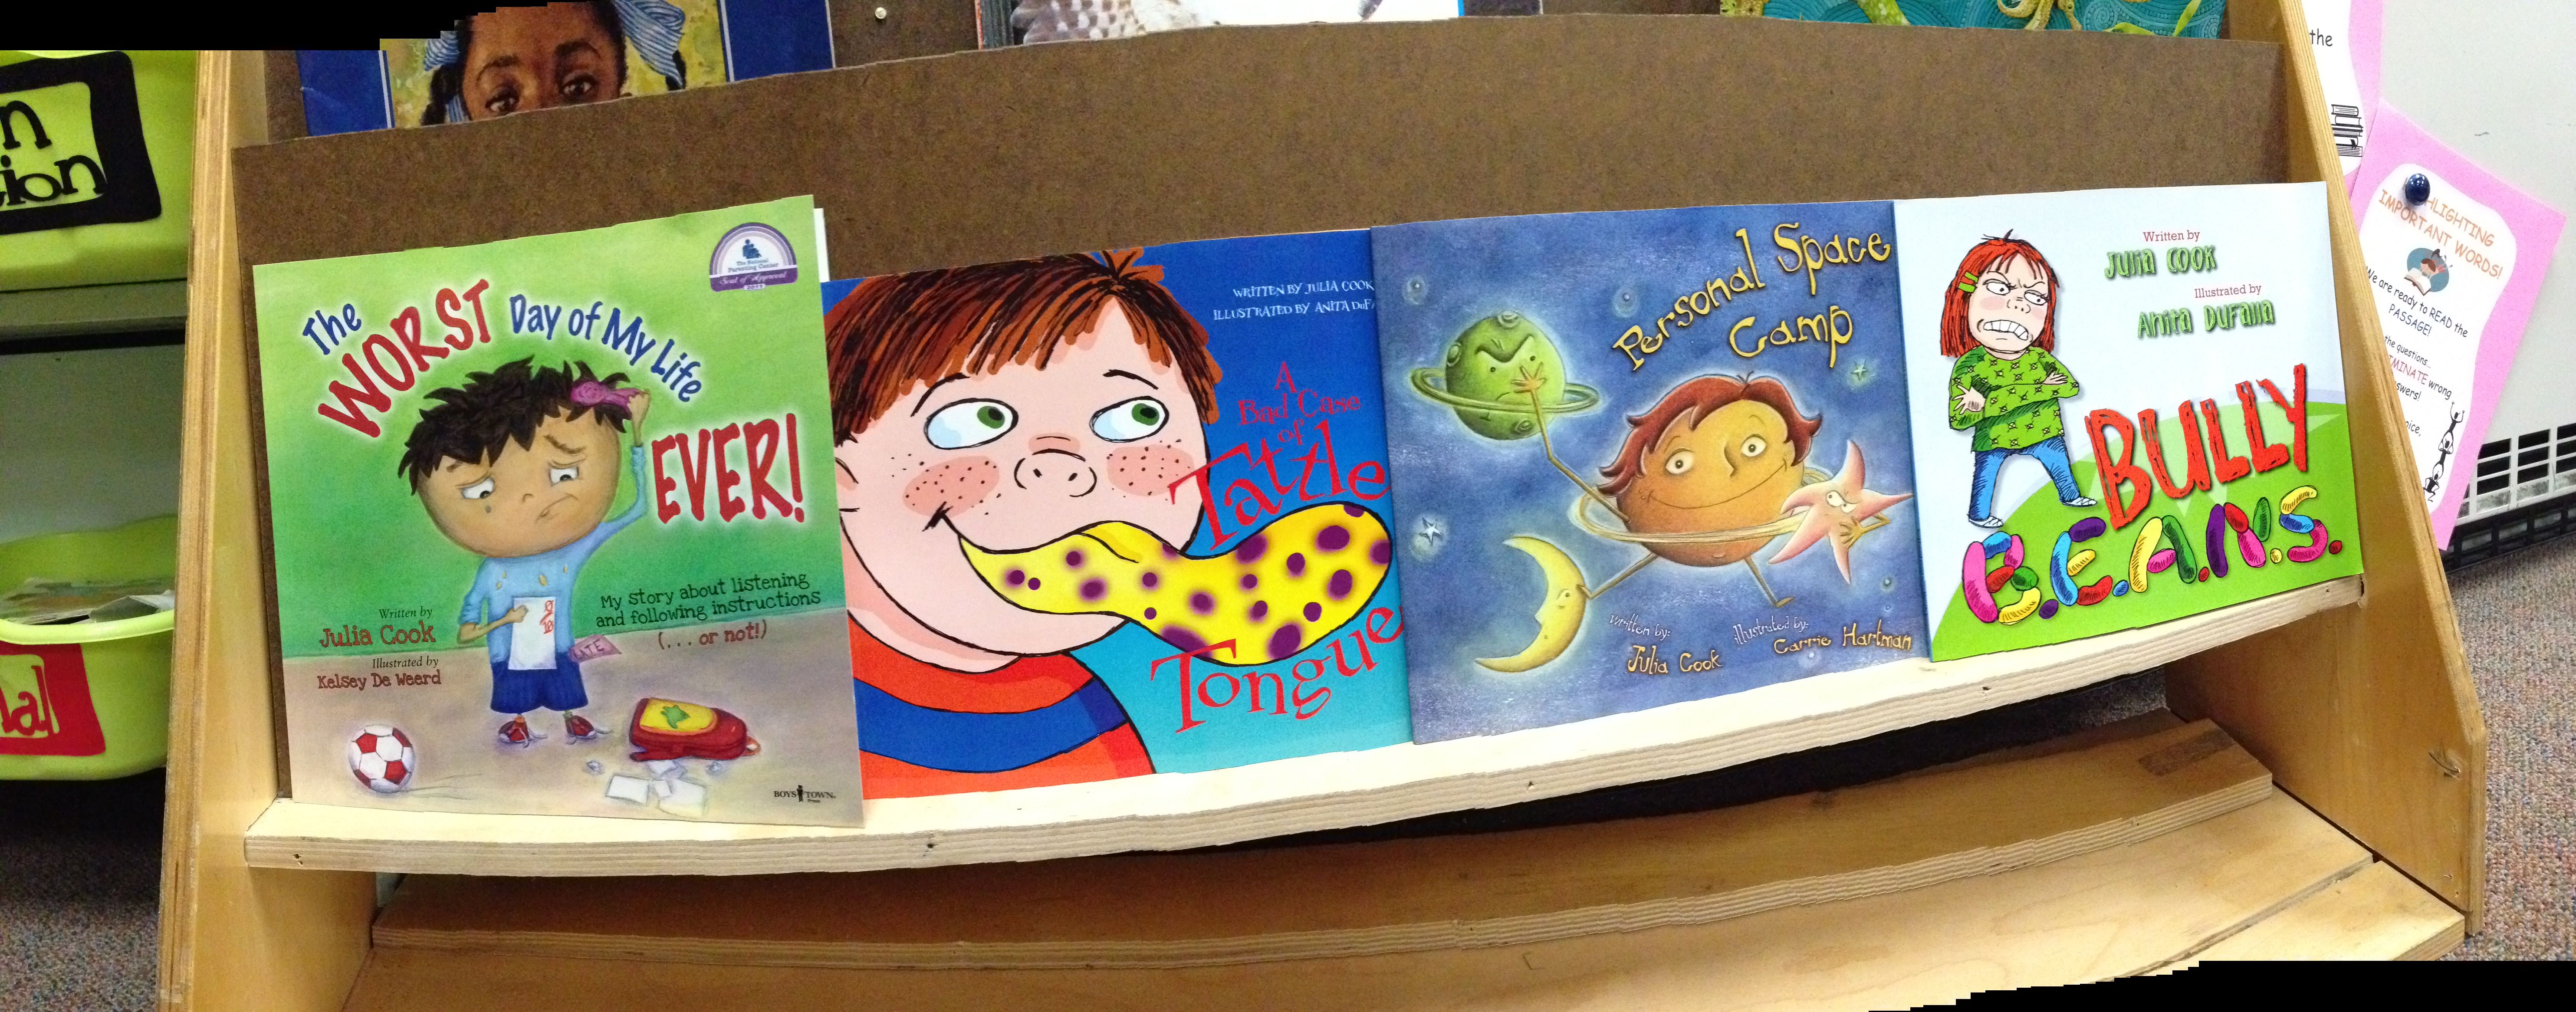
This book is hilarious. It is a great story about a boy named Louis that has a hard time shouting out and interrupting others. His teacher and parents are always getting onto him for interrupting. Louis has so many important things to say that he just can’t hold it in! One day, Louis gets a taste of his own medicine. It is his day to be star student and there are several of his classmates that interrupt him during his 15 minutes of fame! Louis learns the importance of waiting his turn and that it is rude to interrupt people when they are talking. My kids LOVED this book. As you can imagine, I have a few of these so called “volcano mouths” in my classroom, especially at the beginning of a new school year! This book gave us a chance to talk about real issues that we deal with on a daily basis at school. My Mouth is a Volcano is the only book in her collection that I currently have. She has written a ton of other ones that would be a great addition to my classroom! Click here to see some of her other books. A few particular ones I would like to get my hands on would be Personal Space Camp, A Bad Case of Tattle Tongue, Bully Beans, But it’s Just a Game, and any other book in her collection let’s be honest!
If you are one of my teacher friends, you should look into signing up! If you would like to sign up to send a care package to a teacher in need, all you have to do is click here to get signed up before the morning of September 3rd, 2013!
Thank you reddit for all you do!
***UPDATE
I received a package on Saturday afternoon from Amazon. I was a bit puzzled, as I had not ordered anything recently from Amazon. It was my gift from redditgifts for the Teachers that I signed up for last month! There was a gift note from the sender that read, “Hope your classroom enjoys these!” Thank you so much for gifting these amazing books for my classroom! I am excited to read them to my class!
These are the amazing books that I received from redditgifts for the Teachers. A big THANK YOU to the redditor who gifted these books to my classroom!