To celebrate Martin Luther King in my second grade class, we did this diversity art lesson. I have been searching for the website that I printed this template out from but I am having a hard time locating it, as I printed it off at school so as soon as I figure out where I found it from I will get that link in case anyone would like to make them. They would be pretty easy to make by hand or finding a body with wigs template. I was thinking next time I would just cut them from my Cricut and then let the kids decorate them. I just copied the templates on a few file folders and the kids just traced them. I had to add an extra hairstyle because they were a bit girly. (I kept calling them wigs and it made them giggle…kids are so funny!)
Each kiddo did a little half moon with 7 people holding hands. Putting them together really pulled the activity together even more!
These took a lot longer than I would have expected but it seems like the art projects we enjoy most take a little more time than others! The original website I found these on were a bit different. The instructions called to have them cut part of the arms and link them around something round. I did not like how that turned out so I just decided to make them do little half moons. It was not until I started hanging them that I decided to make the full circles around the door. It actually turned out even cuter than I had expected which is always a nice surprise.
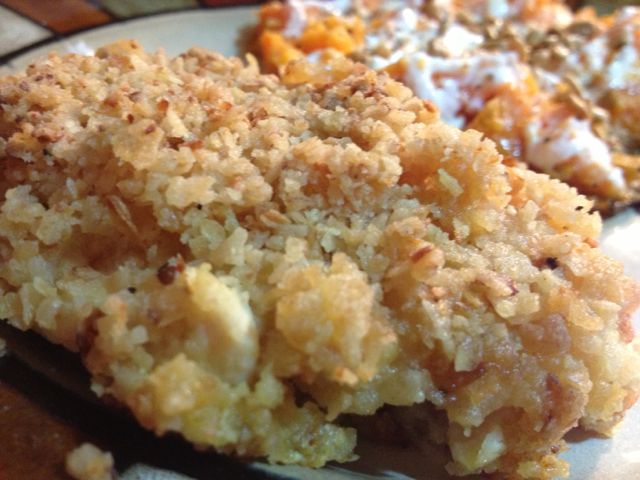
Tonight I am making one of my all-time favorites for a few years now. I can’t remember where I saw this at. I have made this one since I was in college. I mean who doesn’t like fried chicken? You would be crazy if you didn’t (seriously!) but it is not the healthiest dinner idea either. In honor of my new 2013 health kick I decided it is time people in the Pinterest world become aware of this delicious main dish! There have been a few Pinterest recipes that say I could use honey mustard instead of egg but I am not sure if that is a good idea. However a bit of tangy flavor might be good so I am going to try it. I will let you know how it turns out but usually I use 2 eggs beaten without honey mustard. I got my original recipe off the French’s website. After a few runs at it I always added more flour for more breading and sometimes I season my egg mixture up a bit. So this one may vary since I am deciding to play with it.
As many of you know my man is an amazing cook. He has been ever since the days I laid eyes on him in his backwards Applebee’s trucker hat 😉 He has taught me a lot about cooking even though I would like to think I wasn’t a terrible cook before we started dating. I will admit that I never cooked with fresh vegetables or garlic before we got together. I would never cook with dried onions unless it was an emergency now! I used to go through garlic powder like crazy and now we always have fresh garlic on hand. I will say I was shocked the night he had me over for dinner one night and made me instant mashed potatoes. I was like people actually make those?! I would NEVER!!! I was disgusted…and he later learned why when I made him my uncle Randy’s famous mashed potatoes….See I can actually teach him a thing or two 😉
Anyways now I am way off track…so back to Alex teaching me things about cooking. I am one of those people who cannot be patient with thawing meat. Actually I always attempt to have an idea of what needs to be thawed out if we are cooking that night. Lets be real though people…life gets in the way and sometimes we forget or we get home and are ready to cook something but we don’t have a few hours to let meat thaw out. (I used to run to the store and buy meat that was not frozen) Normally I would fill the sink up with hot water and wait for it to thaw out.
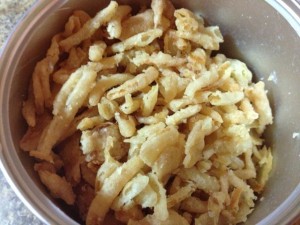
If you take a gallon plastic ziplock bag and put the meat in there with cold water THEN fill the sink up with hot water the meat will actually thaw from the inside out! It takes roughly an hour to thaw out which is usually not too bad of a wait! I do this with any meat whether it is steaks, hamburger, sausage, etc. It really helps speed up the process and I had never heard of it before.The worst part of these is keeping myself from eating the can before I start crushing!Put the fried onions in a ziplock and crush them up good! After they are crushed you want to add the 3 tbsp of flour and some pepper.This is the first time I made this eggwash with honey mustard and I must say it was AMAZING! Everything stuck better when I rolled it in the breading. I also threw in a few cloves of fresh minced garlic to kick it up a notch!Finished product! DON’T forget to flip it halfway through. (I usually throw some more breading on top before throwing it back in)
Fake-out Fried Chicken
4 chicken breasts
1 egg
1 bag fried onions
3 tbsp all purpose flour
2 minced fresh garlic cloves
honey mustard
salt, pepper
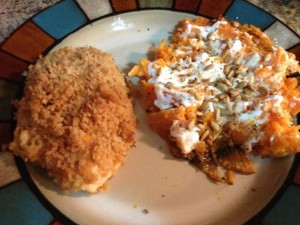
Preheat the oven to 400 degrees. Crush up the fried onions. Mix the flour in the crushed fried onions thoroughly. I usually add some salt and pepper to the mixture just to give it some extra flavor. In a separate bowl, beat the egg and a generous amount of honey mustard with the minced fresh garlic and some more salt and pepper. Dip the chicken breasts in the egg mixture followed by the crushed onion mixture. Place in a glass dish or pan and put in for 20 minutes. I think the key to this is to pull it out after 15 minutes and turn the chicken over to make sure both sides get crunchy. Then I put it back in for 5-7 minutes depending on how thick your chicken is.
Sooooo yummy!!
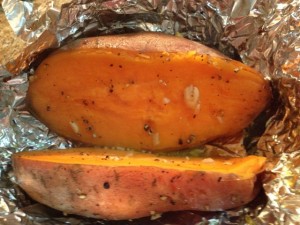
While at Hyvee I grabbed a few sweet potatoes because after Alex introduced me to sweet potato fries I am all of a sudden OBSESSED with anything made of sweet potatoes! I love them!! I have been debating making sweet mashed potatoes with greek yogurt instead of sour cream. Then while browsing around on Pinterest (As I do most of the time!)…I found a really yummy recipe for these sweet baked potatoes with greek yogurt mash from a blog called Sense and Serendipity . I tweaked it to my own liking because I am a firm believer in the power of olive oil! I must say it was delish!
Sweet Baked Potatoes with Greek Yogurt
2 sweet potatoes
olive oil
2 minced garlic cloves
salt and pepper
1 tub plain greek yogurt
honey
nuts of some sort…walnuts, pecans, sunflower seeds, whatever you have in the house to add a crunch
I tend to see ideas on Pinterest and then I think I need to put my little tweak on it so hopefully it works! I make sweet potato fries and steak fries all the time but they are frozen and I just follow the bag instructions. So I looked at a few recipes and decided to try baking them in foil. I cut them in half long ways and drizzled olive oil all over. Then I seasoned them with salt and pepper and I threw some minced garlic. (Hopefully that doesn’t bite me but it sounded good!) These took longer than I was expecting but I think it was because I was STARVING when I started cooking in the first place. I cooked them at 400 degrees for about 50 minutes. The best part about these sweet baked potatoes are how Weight Watcher “friendly” they are! They are 4 points for one sweet potato 5 inches in length! I could only do half and I was full so that was even better!
They turned out so great and the garlic was a great compliment to the potato!This looks like it would be awful for you but that plain greek yogurt proved to be a fabulous sub for sour cream!Eating healthy isn’t so bad! I could get used to this!
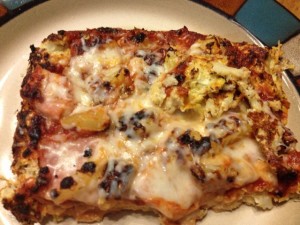
So today I am going to be sharing a new recipe that I found on Pinterest. The original pin that I found was from a blog called Recipe Girl. With some input from Alex I made this twice and tweaked a few things so here is my version.
Hawaiian Cauliflower Pizza
Cauliflower Hawaiian Pizza
Crust Ingredients:
1 Whole Cauliflower
2 Eggs
2 Cups Shredded Mozzarella Cheese
2 Garlic Cloves
2 Tsp Oregano
1 1/2 Tsp Onion Salt
3 Tbsp Grated Parmesan
Olive Oil Cooking Spray
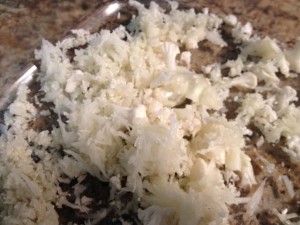
Preheat the oven to 450 degrees. Cut the cauliflower in about 6 pieces that are large enough to grate without ripping your fingers off! I wish I woud have had that instruction the first time I made it because I had cut it up too small and did manage a few snags…ouch!
After shredding all the cauliflower make sure to microwave it for 8 minutes. If you do not have a microwave just throw it in the oven for 4 or 5 minutes.
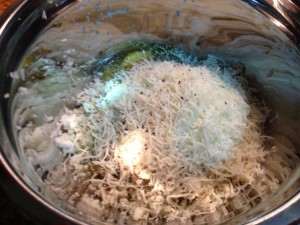
After the cauliflower cools off, add the eggs, cheese, chopped fresh garlic, oregano, and onion salt.
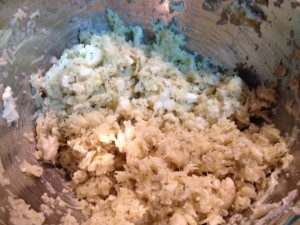
All mixed up!
After thoroughly mixing the ingredients pick up handfuls at a time and squeeze as much moisture out as possible. (I am debating using 1/2 cup mozzarella cheese and 1/2 cup grated parmesan next time to dry out the crust a little) Spray a cookie sheet or pizza pan and spread the mixture out until you form a pizza crust. Sprinkle grate parmesan on top before putting in the oven for 15 minutes.
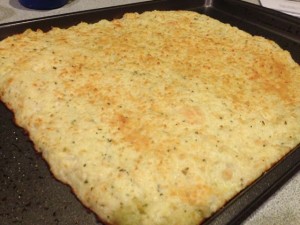
What a beautiful crust!
Topping:
Canadian Bacon or Ham
1 Cup Mozzarella Cheese
Fresh pineapple tidbits
Pizza Sauce
We used some smoked ham that we had left over from the Trager which worked beautifully. Put as much sauce as desired on your crust topped with 1/2 cup mozzarella cheese. Then top with the meat and pineapple. Finish off with one last sprinkle of the rest of the 1/2 cup cheese that is left. Give the whole pizza a spray or two of cooking spray right on top. Put in on broil for 2-3 minutes. WATCH IT CAREFULLY! The first round I spent 15 minutes salvaging the cheese because it burnt the top layer good. This was my first time using the broiler on the oven so it was a learning experience for sure! It gets HOT HOT HOT! The second time I made this I turned the light on in the oven and sat there and starred at it until it looked like it was ready to go!
Once the cheese is melted and bubbly it is time to enjoy! Cut it into 4 slices and you are good to go! Enjoy a healthy version of one of everyones’ favorite dishes!
Cut into 4 slices and enjoy! Only 9 points on WW Plus!
I just wanted to take some time to throw out a HUGE thank you to my amazing boyfriend Alex! He has done so much to get me going on this blog as well as Amber’s Craft Studio! I was so excited to get my Cricut for Christmas even just to play around on for my classroom. I feel like it has opened up a whole new world for me! I have discovered a love for card-making that I would have never known about without this amazing machine!
I also have to say THANK YOU for putting my craft tables together so I can spread out and get creative! Here is a view of the final product! Not to mention the new Mac he built me to make designing easier! I cannot wait to spend my days crafting away in my new lil office!