Posted on Leave a comment

Glass Etch Gift

Here is the future Mrs. Mitchell at her bridal shower...I made the banner...tutorial to come!
Here is the future Mrs. Mitchell at her bridal shower…I made the banner…tutorial to come!

My step sister is getting married in a few weeks! After taking care of things at the fireworks stand, Alex and I traveled down to Ulysses for Heather’s bridal shower and bachelorette party. I have been dying to do a glass etching project now that I have played around with vinyl a bit. This was the perfect opportunity to do it!

Sister love at Heather's bachelorette party.
Sister love at Heather’s bachelorette party.

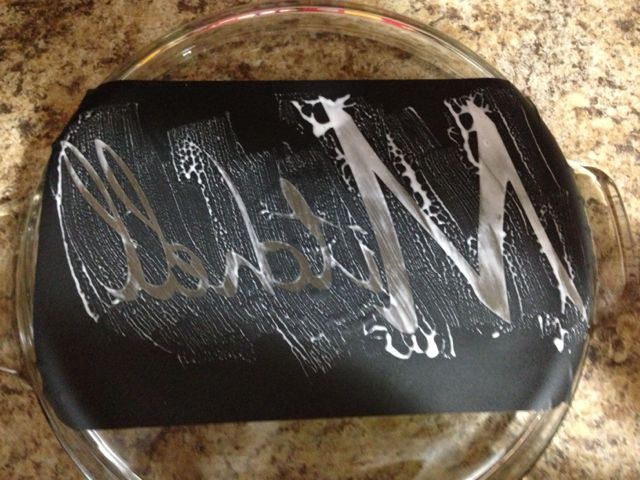
This project was actually super easy. I bought a glass pie dish from Walmart. I found the etching cream at my favorite place on Earth….Michaels! Using Cricut Craft Room, I created a cutout with Heather’s soon-to-be last name on vinyl. The thing to remember here is to mirror the image before you cut it when placing it on the bottom side of the dish. The reason for this is that you do not want the etching to be on the part of the dish that you bake in. If you are putting the etching on the side of a dish, you will not want to mirror it but on the bottom you do.

Cut out a piece of vinyl with whatever you want to be etched into the glass.  REMEMBER...it is important to do the etching on the side of the dish that will not have food touching it.  In this case, since it is on the bottom, I had to mirror the image.
Cut out a piece of vinyl with whatever you want to be etched into the glass. REMEMBER…it is important to do the etching on the side of the dish that will not have food touching it. In this case, since it is on the bottom, I had to mirror the image. After centering the vinyl and making sure all of the air bubbles are out, apply a thick layer of glass etch (I probably should have made a thicker coat to make the etch stand out more, but it was my first time!) Let the cream set for a minute. Then rinse with luke warm water.
After rinsing the dish, be amazed with your beautiful personalized bakeware!
After rinsing the dish, be amazed with your beautiful personalized bakeware!  I had a hard time getting a good picture but this was as good as it got!  The dish is easier to see in person and I loved how it turned out!  Heather was impressed when I told her I made it!  I love that feeling!!!

Heather loved the dish! Her exact words were, “No one will steal MY pie dish!” I will definitely be making these for gifts more often! In fact, I am excited to etch away at the glass dishes in my cupboard! If you have any questions, feel free to ask!

Posted on Leave a comment

Gift for Baby Case

Words cannot express how exciting it is when the time comes to welcome a new baby into this world. Family is the most amazing gift we have in life and I am so blessed to have such amazing people in mine! My cousin Melanie has been busy getting ready for her little boy’s debut.

Melanie and I celebrating our great grandma's birthday in March.
Melanie and I celebrating our great grandma’s birthday in March. Check out that lil baby bump!
My mom, Melanie, me, Grandma Bloesser, and Great Grandma Chilson

Melanie has the sweetest baby room ready to bring that baby home to!  She decided on a “Dr. Seuss” theme nursery, which I LOVE! What is not to love about Dr. Seuss??  His numerous stories, cartoons, and riddles are so stimulating and magical!  (In fact, we watched a Dr. Seuss movie in school the other day and it was so fun to watch the kids expressions while they were watching it in amazement!)

Here is a little sneak peak of the nursery...
Here is a little sneak peak of the nursery…
The Truffula Trees!
The Truffula Trees!

It was only fitting that I came up with a project for my newest family member!  I was excited when Melanie told me she was doing Dr. Seuss because last school year I taught my second graders to draw Dr. Seuss by following a link on Pinterest.  Turns out, it really was not that hard and mine turned out pretty good!  I was even inspired to try to start drawing some in my free time.

So I took a stab at it again...This time with an attempt to juggle little Case's name!
So I took a stab at it again…This time with an attempt to juggle little Case’s name!
The frame had to be over the top, so I got out the paint and mod podge...
The frame had to be over the top, so I got out the paint and mod podge…
Topped off with the most perfect quote from the Dr. himself!

And guess who decided to make an appearance yesterday!…

Case Wayne Brewer 8lbs 7 oz. 20 inches long

Meet the Brewer’s

Justin, Maddy, Melanie, & Case Brewer


Posted on Leave a comment

Stuffed Peppers

I am not sure words can describe how much I am enjoying working part time this summer!  Eventually when I have little ones, I will probably stay home for the summer.  For now…I am working on paying off a credit card, so it is very necessary to work over the summer to bring in some extra funds to get that bad boy knocked out!  Anyways, I am off by 12:30ish Monday through Thursday and have 3 day weekends and have had so much more time to get things done.  I have been impressed with my ability to keep the housework going and having time to do all the things that I love!

Tonight I made stuffed peppers for dinner.  When I went to the store, I had planned on making quinoa to mix in and managed to grab some couscous instead.  I have always wanted to try cooking couscous and tonight I did, even if it was by accident!  They turned out so good and were really easy!  I am glad I made enough for left-overs and they were very filling!

Ingredients:

Ingredients
Ingredients needed:  couscous, ground turkey, Hunts Chunky Vegetable, garlic, medium sized onion, 4 peppers, salt & pepper, and cheese (not pictured).

Instructions:

Cut the tops off the peppers and hollow out the seeds and core.
Brown the turkey with minced onions and 2 minced garlic cloves.  Add the Hunts Pasta Sauce.  Simmer on low for 15 minutes.
Brown the turkey with minced onions and 2 minced garlic cloves. Add the Hunts Pasta Sauce. Simmer on low for 15 minutes.
Cook couscous according to packaging.  The one I used was garlic and olive oil...it was delicous.
Cook couscous according to packaging. The one I used was garlic and olive oil…it was delicous.
I started with a layer of meat sauce.
Then I packed in the couscous about 3/4 the way up.
Then I topped the couscous with more meat sauce.
Top the peppers off with some cheese.
Top the peppers off with some cheese.  Wrap some foil around the baking dish and bake on 375° for one hour or until peppers are tender.
Finished product!  So yummy!
Finished product! So yummy!


Posted on Leave a comment

Origami Dog

This year for summer school, we are traveling to a different place in the world. This week we went to Japan! We have been planning a fun art project each week. I decided what better chance to teach the kiddos a little origami!  I did do this with small groups.  I would recommend this because Ms. Nuckles ended up doing a lot of helping!  My advice would be to pull small groups to a table or have a helper (or 2) help out if doing this in whole group.  Let’s just say if I had a dollar for every time I had a 1st grader say, “Like this?  Like this Ms. Nuckles”!  It was fun!  We talked about what we would name the dogs.  They had a lot of fun with it and so did I!

Start out with a piece of construction paper.
Fold one corner over to make a giant triangle.
Cut out the triangle.  (We had some extra time after we were finished and I let the kiddos make some bookmarks out of the piece we cut off)
Cut out the triangle. (We had some extra time after we were finished and I let the kiddos make some bookmarks out of the piece we cut off)
Point the triangle towards you like shown in the picture.
Fold down one side to make the first ear.
Do the same to the other side.
Flip the paper over and fold the tip back
Flip the paper over and fold the tip back to make the chin.
There is your dog!  Have the kids make a face on their dog.
There is your dog! Have the kids make a face on their dog.
I named mine Spot!  The kids had fun.
I named mine Spot!